How to install and start using LineageOS on your phone.
If you can program in assembly, all software is Open Source.
Android is one of the most popular operating systems in the world. I is probably also one of the most versatile, used on PCs, phones, cars, autonomous devices such as drones, fridges, and many more.
However, unlike Windows or Linux, which boast a lot of ready-to-buy manuals, guiding the user from zero to confident usage of the system, Android is a system which is expected to be “used intuitively”. Maybe initially it was like this, but many years have passed since a cute new OS codename “Donut” was released on a couple of phone models.
Hopefully, this manual can serve as a “missing manual” for people who want to use Android efficiently, which is more relevant in 2026 than ever, because a few releases ago Google introduced a “Desktop Mode” for Android, which means that at some point users might consider homogenising their computing environments: both the laptop and the phone will be Android.
0.1. Warning 1
I am not a programmer by trade, I had zero fun doing all of that, and many things I did were probably crutches intended to overcome Android’s lack of documentation.
0.2. Warning 2
This manual is born out of my own experiences of learning Android, and it is missing several important bits which I did not have a necessity or opportunity to research:
- Binder, AIDL, HAL, and
servicemanager:: for such important concepts they are barely mentioned - Storage system, filesystems and providers :: same woe
- SurfaceFlinger and AudioFlinger :: same woe
- Kernel building and dtb/dts/dtsi :: There are a few remarks I can make about building a kernel, but the topic is too large to cover.
- VINTF
- App development is barely a sketch with a few links, but I do not mind this really, as there are a lot of books on app development
These subjects are marked by the “TODO” marker, and I would appreciate if someone sends me a piece of text to fill in each of this lacunae.
So, despite having several TODOs this document is considered “finished” in its current form in the sense that I do not plan to pro-actively improve it. (If I even have a real need to fill-in the lacunae, there will be a new “version”.)
1. The Manual
1.1. Background
Why is it worth installing an OS on your phone? I guess my noble readers will not buy an ideological excuse “to be able to do anything you want with your phone”, because what is it that you really need to do with your phone? Every extra movement has to be justified.
Why is just having a root account on your phone not enough?
Firstly, one answer to this is private app permissions.
So-called “private apps” on Android have permissions exceeding those of normal “system apps”, and they have to be signed with the “platform key”, which is only possible having access to the manufacturer’s “private key” (https://en.wikipedia.org/wiki/Public-key_cryptography).
Secondly, having a vendor-independent OS on your device makes less likely that you become dependent on a program of a particular vendor solving your pain point. What happens if the vendor stops supporting your program or even goes bankrupt? If you sufficiently rely on your favourite program, you are going to suffer, and if you do not, you are probably under-using your phone, it could serve you better.
Thirdly, third-party developers are much more likely to invest into developing code for an open system than to a system fully controlled particular vendor. I bet you really do not want to read ASUS’ developer documentation.
Fourthly, I have not found a way to run adbd (see later) as root on my (rooted) previous phone, which makes backing things up a bit more of a pain.
I really love backing things up.
In particular, I have a script to restore a familiar working environment on a phone even if its predecessor was crushed in a car crash.
Just copy a bunch of settings from the laptop and you are good to go.
Fifthly, this allows you to update SELinux policies without the pain of decompiling them.
Sixthly, installing your own system services becomes much simpler, no need to suffer from Magisk any more.
1.2. Building LineageOS
In theory, this part is not even that badly documented:
1.2.1. Git and repo
- https://source.android.com/docs/setup/download/source-control-tools
- https://www.akshaydeo.com/switching-branch-with-repo-for-android-source-code/
- https://source.android.com/docs/setup/reference/repo
repo is a tool to fetch Android.
It is essentially a different (to git submodule) approach to multi-repository source trees.
You initialise it by running
repo init -u https://mirrors.tuna.tsinghua.edu.cn/git/lineageOS/LineageOS/android.git -b lineage-23.2 --git-lfs
The same command should also work when switching versions. In theory it is enough to just replace the branch name.
There are tricks, however.
repo is not error-resistant.
When it fails, it does not take care to restore the original state of the source tree, it just fails, often leaving individual git repos in an inconsistent state.
You might have to repair those repos manually, usually by aborting merges, committing uncommitted files, or something like that.
repo is basically just helps maintaining a list of git repositories, revisions, and remotes, and calls git commands for individual repos.
The files to study to understand it are: ./repo/manifests/default.xml and ./repo/.repo/local_manifests/local_manifest.xml.
The first one is the list of repos for the main tree of Android, and the second one is for you to add references to repos specific to your device.
Remote server definitions are quite self-explanatory, except, perhaps, a special path called "..".
This is a parent directory with respect to the default repo.
There is an XML tag for “default settings”, called default:
<default revision="refs/heads/lineage-23.2"
         remote="github"
         sync-c="true"
         sync-j="4" />
1.2.2. The build system, Soong, ckati, ninja, Android.bp, and Make
Official build system documentation is so terrible that I am not even linking it here, as it’s completely pointless.
It is convoluted and consists of several mutually duplicating parts.
You might hear the words “Soong”, “CKati”, “Jack”, and “Bazel”. There are also shell functions (pay attention, they are not files!, they are bash functions), which are expected to control the build, and they also seem to have bit-rotted a bit.
First of all, go to build/make, and add a pair of commands to enable ccache when building Android.
diff --git a/envsetup.sh b/envsetup.sh
index 12a69fc77b..d20f01aac7 100644
--- a/envsetup.sh
+++ b/envsetup.sh
@@ -15,6 +15,10 @@
 # gettop is duplicated here and in shell_utils.mk, because it's difficult
 # to find shell_utils.make without it for all the novel ways this file can be
 # sourced.  Other common functions should only be in one place or the other.
+
+export CC_WRAPPER=/usr/bin/ccache
+export USE_CCACHE=1
+
 function _gettop_once
 {
     local TOPFILE=build/make/core/envsetup.mk
Or you can add the same lines to your own bash build script, which is expected to source the aforementioned source build/envsetup.sh.
This is documented somewhere, but the page mentioned does not seem to have this any more.
The bash functions you might find are the following:
mmmmakemkabreakfastbrunchlunch
In theory they were expected to have their own meaning, in particular, breakfast is expected to select the device configuration for building.
However, in my experience you usually only have a single device in the source tree anyway, so you do not need it.
There should be a way to switch between debug, userdebug, and release configurations with these:
lunch lineage_<codename>-<build number>-<build-flavour>
Where codename is your device code name (you have to find it out!), and it is not the same code name as board code name.
For example for my device the code name is xigua (Chinese for Watermelon), and the board name is kalama (a city name).
But in my case just typing brunch xigua was enough.
In any case, in order to just run the build with a single command, I wrote a bash script:
export CC_WRAPPER=/usr/bin/ccache
export USE_CCACHE=1
( reset
rm out/target/product/xigua/lineage-23.0-*-UNOFFICIAL-xigua.zip*
source  build/envsetup.sh
( cd  ~/Lineage-Camera/cam-oplus-15/
 ./mine_repack-cam.bash || exit 1
 exit 0 ; )
( cd ./vendor/oplus/camera/
  ./extract-files.py --no-cleanup  ~/Lineage-Camera/009_15.0.0.860 || exit 1
  exit 0 ;  ) || exit 1
printf "mine:camera files extracted\n"
( cd device/oneplus/xigua
  ./extract-files.py --only-target --no-cleanup  ~/Lineage-Camera/009_15.0.0.860 || exit 1
  exit 0 ; ) || exit 1
printf "mine:device files extracted\n"
export CC_WRAPPER=/usr/bin/ccache
export USE_CCACHE=1
brunch xigua  || exit 1
exit 0 ; )
RETVAL=$?
if (( RETVAL == 0 )) ; then
  espeak 'compilation finished with success'
else
  espeak 'compilation finished with failure'
fi
This build script is more complicated that I mentioned, but there are reasons for that.
- There is a need to extract binary drivers from the original firmware.
- There is a need to modify the camera app so that it would run on LineageOS.
It might happen that you do not actually need (2), but you will probably need (1).
This is documented here quite decently: https://wiki.lineageos.org/extracting_blobs_from_zips_manually.html
1.2.3. Android Studio and Android Studio for Platform
- Android Studio :: https://developer.android.com/studio
- Android Studio for Platform :: https://developer.android.com/studio/platform
- Gradle :: https://gradle.org/
- Emacs + jdtls
I need to mention these, because they exists. I did not use them much, except for writing a small polyfill library, so I cannot produce a meaningful critique. In general, Android Studio is quite a decent tool, it is a version of JetBrains IDE, so, basically, the best IDE available in the ecosystem. It is a safe choice, unless you are good enough of a developer to assemble your own tool-belt, based on Emacs.
If you want to setup Android Studio for Platform, see the howto file in the LineageOS repo:
./lineage/wiki/pages/how-tos/import_to_android_studio.md
I use Emacs for development, but even though Emacs supports Eclipse JDTLS LSP server, it does not support Android java, so I ended up doing find+grep (fd+rg), like in the old times.
1.3. Basics of Android architecture
- Android Internals: A Confectioner’s Cookbook :: http://newandroidbook.com/
I don’t actually understand what I am writing here. Not because I was not reading enough, honestly, but because all of it is so poorly documented that I am missing vocabulary to express my frustration.
1.3.1. Overview
- Android code, C and Java
So, Android is basically Linux with a custom init, custom linker, custom libc, and custom standard IPC.
In theory, you can use it as you would use Linux, with Linux users, command-line, shell scripts, C programs and pipes. (Yes, pipes work on Android.)
Android is mostly written in C++ and C, but it has first-class support for a variety of Java, which is to an extent compatible with Sun’s JVM.
Java, despite being an interpreted high-level language, is getting preferential treatment on Android, in the sense that by the way of some artificial means some APIs are only available through Java calls, and are unavailable through native C calls.
How can this be? Of course, everything boils down to the C calls at the end, but some C calls can only be done by the Dalvik/ART Java virtual machine, and cannot be done through native libraries loaded through JNI.
Yes, Android supports JNI. For those who do not know, JNI is “Java native interface”, a way for Java programs to call C code. Android has its own version of JNI, which generally works, and you can develop native “.so” files for “apps” using a set of programs called the “NDK”.
Make no mistake, the “native code” developed using “NDK”, even though it is normal Linux native code, is not subject to the same restrictions on API as the native code in the Android tree.
I am not exactly sure how these restrictions are enforced (probably through the dynamic linking mechanism), and the issue is complicated by the fact that native NDK “.so” files can “dlopen” native Android “.so” files.
- Android processes
But the basic difference is that the way “apps” and “native processes”, even though both are actually represented as native Linux processes in the kernel, are spawned in different ways. Processes spawned by init or shell behave mostly like normal Linux processes, and are run through
forkandexec, whereas “apps” are spawned by asking a primordialzygoteprocess to parse an.apkfile,forkand load it into its JVM. This allowszygoteto set restrictions on what a process can do, to drop privileges so that each “app” process is running as a separate Linux user, obtain a different SELinux context, and probably do something else. This means that all “app” processes have as their “image” (that is, the initial binary file) the same binary calledapp_process64. You cannot call it directly though, which makes it an issue for debugging (with a debugger) “app” processes, because you cannot start them thorough a debugger, you have to attach afterzygotehas already done its shady business.There is a way to execute
dalvikdirectly, with the commanddalvikvm, which asks for a class name, but I have not found a way to use this productively somehow.The default language is
mksh, which is very similar to GNU Bash, but less sophisticated.- write into system log by
log -t TAG "message" inotifydis usually availableflockis usually available- You can download a lot of statically built standard programs https://files.serverless.industries/bin/
- write into system log by
- Init scripts and services
- https://android.googlesource.com/platform/system/core/+/master/init/README.md
- https://source.android.com/docs/security/features/selinux/device-policy#label_new_services_and_address_denials
I have not modified init files extensively, but Android’s init is a decent init system, which can start a system service (what is usually called an Android HAL in the documentation) and restart it when it crashes.
servicename.rcfiles are put into/etc/init/. Their syntax is well documented https://android.googlesource.com/platform/system/core/+/master/init/README.mdBless Google for not using SystemD for Android, but choosing a sane system.
You can write a simple init file for starting a service at boot:
service example_service /system/bin/sh /bin/example_services.sh class late_start # Starts after core system services are up user root # Runs as root group root shell seclabel u:r:shell:s0 oneshot # Runs the script once and then stops the service - Frameworks
Zygote (Java) processes can use a set of libraries pre-packaged with Android, called “frameworks”. This frameworks wrap a lot of native code, and some code is only available through “frameworks”, unavailable through native “.so” libraries, even if they are loaded through JNI by Zygote processes.
I think, but not sure, that some Java libraries can be installed on an already bootstrapped system as
apkfiles, and then their classes become available for use by other Java code. At least this is what seems to be happening when we install Google Services on de-googled phones.This is supposed to be explained on this page: https://source.android.com/docs/core/architecture , but if you can understand what the hell is going on there, you are certainly smarter than I am. In particular I am unable to understand how “system services” can be both above and below “android runtime”, and what actually is that thing called “HAL”, which is mentioned about a thousand of times in the Google documentation, but never actually defined.
In any case, if you want/need to add some Java libraries to your phone, the easiest way is to add this code to the “frameworks” module. (I have not yet defined modules, sorry, but bear with me, they will be defined soon.)
In fact, most phone manufacturers seem to add their own Java libraries to their phones, in order to make their phones unique and more functional than their competitors’.
In particular, the company BBK, manufacturing phones branded OnePlus, is adding its own Java library called “oplus-framework.jar” (and many others). In LineageOS it is usually replaced with an Open Source alternative called “oplus-fwk.jar”.
Pre-installed Java libraries are called “boot jars” or “framework”. (To be honest, I do not actually understand the difference between “framework” and “boot jars”.)
For example, on a OnePlus phone, there are the many Java libraries:
fd '.jar$' system/framework/ system_ext/framework/ | wc -l
225
On a LineageOS, there are a few, but much less:
fd '.jar$' out/target/product/xigua/system/framework/ out/target/product/xigua/system_ext/framework/  | wc -l
70
I have no idea what is the difference between “system” and “system_ext”, and the description in the documentation seems vague.
This, in any case, should prove to you that installing LineageOS is a worthy business, as who knows what all this unknown unaudited suspicious code is doing on your phone, especially running as “framework” (that is, “trusted”) code? It might be transmitting your credit card numbers and medical records to some moles, who worked for BBK and managed to embed malicious code into their jars.
Pre-installed Java classes (not file names) need to be declared in the file
build/soong/scripts/check_boot_jars/package_allowed_list.txtPre-installed Java libraries (files) should be added to module definitions by adding the following lines:PRODUCT_PACKAGES += \ org.microo \ com.heytap.market \ com.heytap.cloud \ com.coloros.cloud PRODUCT_BOOT_JARS += \ oplus-support-wrapper
PRODUCT_PACKAGESneeds to have Java classes, not file names listed, whereasPRODUCT_BOOT_JARSshould have jar files.Note that if you add your own Java libraries to your build, your patch will probably not be accepted neither to AOSP, nor to LineageOS, because… hmm… well, I guess they want to keep the system minimalist?
- Modules, packages, and activity management
One of the first thing a programmer is looking for when learning a programming language is “how is code structured into modules”. Even in the most basic “protected mode” bare assembly there are sections and segments in memory, supported by hardware. Most people are used to the idea of “adding” a module to a system or “removing” a module from a system without a requirement to write any new code.
There are two, seemingly non-overlapping concepts of “modules” in Android.
One is “soong namespaces”. Soong is the Android build system, already mentioned before, and its modules are defined in the
Android.bpfiles, and each module usually occupies a directory in a source tree.Android.bpwill be discussed later, but you will probably need to have a look at theAndroid.bptargetspackageandsoong_namespace.Important: in order to increase confusion, throughout Google’s documentation, the functions declaring build targets are usually called “modules”. I.e.
soong_namespaceis a module, just as is cc_binary.To increase confusion even more, there are packages which are system modules stored in
apkfiles, named likecom.lineageos.aperture, and there are also “Java packages”, which are a feature of the Java programming language and entirely unrelated to Android, but usually bear the same names as the Android packages.Soong namespaces define how modules can interact with each other, interaction usually being either static linking, or dynamic linking, or
dlopen, or Binder calls.Targets with identical names in different namespaces should not cause a conflict.
Packages, those distributed in
apkfiles, cannot access each other’s.solibraries, but can call each other through Binder, and interact via some allowed UNIX IPC mechanisms, such as sockets.Some
apkpackages are shipped with Lineage, and those come in several flavours:- Built from source: those are literally Android “APP” source directories, copied into
packages/apps/, which are built by Soong itself. - Shipped as pre-built
apkfiles, the Soong target for those isandroid_app_import. You can write your own module with anAndroid.bp, or just add anapktoproprietary-files.txt, andextract-files.pywill generate these files for you.
As far as I understand, there is no way to list which files on the file system are coming from which module, so in this respect Android is missing in 2026 what Slackware already had in 1993.
On the other hand, you can list all packages using
pm list packages.apkfiles can contain JNI-loadable.sofiles, but they are never installed on the file system directly, but rather are passed to apps via a virtual file system. - Built from source: those are literally Android “APP” source directories, copied into
1.3.2. TODO Kernel
Okay, I know nothing about building the kernel for LineageOS, except that it is built with bazel, and is shipped in three source tree modules:
kernel/<manufacturer>/sm8550kernel/<manufacturer>/sm8550-devicetreeskernel/<manufacturer>/sm8550-modules
Kernel is one of the most interesting things in any Linux system, but I did not need to deal with it yet.
The only thing to note is that Android is not using udev to determine hardware configuration in runtime, it requires that all system devices be declared in advance in a data structure called “device tree”, which I know nothing about except that it is compiled and that it is also used in Linux on Raspberry Pi.
About modules I also know nothing except that, as far as I understand, the kernel has to be Open Source, as it is under GPL, but modules do not, and a lot of phone manufacturers are providing drivers for their devices only as pre-built modules.
The entry to the kernel build system is vendor/lineage/build/tasks/kernel.mk.
1.3.3. TODO VINTF (vendor interface)
This is another incredibly badly documented part of Android, even though it is central to its architecture. (https://source.android.com/docs/core/architecture/vintf)
So, Android is an operating system, and it needs to talk to hardware.
But it does not want to talk to hardware directly, querying the drivers, or udev or /proc or /sys, it wants to talk to userspace daemons over Binder, and those daemons can implement the userspace<->kernelspace interaction in any way they want.
So it collects a list of requirements , for some obscure reason called compatibility matrix into an XML file, and expects to compare that XML with a device manifest, which is also an XML file, in a similar format, which collects all capabilities of a particular device, which is called a manifest.
The same thing also happens in another direction, so we have framework manifest, framework compatibility matrix, device manifest, and device compatibility matrix.
The most confusing thing is that both of those things are happening in the same source tree!
All four XML files are compiled by the build system, and compared to each other to find if some services are not provided.
I did not have to write them myself, but you probably will, if you want to port Lineage to your own device.
I can only recommend looking at how this VINTF is declared and requested in device/oneplus/xigua.
Device manifest files are usually placed into “vendor/etc/vintf”, or “odm/etc/vintf”, I don’t know which one goes where, and I don’t know how to tell the build system that “these XML files are for the VINTF, and these are not”.
1.3.4. TODO HAL, AIDL, HIDL, and SP-HAL and Binder
This part is also documented poorly and I did not understand it.
As mentioned above, Binder services have to be declared in the “VINTF” XML files, and there should be services, implemented as Linux binaries, started by init from /{vendor,odm,system,system_ext}/etc/init/servicename.rc, which provide their services via Binder calls.
Binder has to do with memory mapping, but it’s not just a place in memory into which you can write some garbage, it’s more like Sun-RPC, there are two versions of the library, and there is a serialising-deserialising server between them.
(https://en.wikipedia.org/wiki/Sun_RPC)
In Sun-RPC, there is an RPC compiler, rpcgen, which creates .c-files from .x files, which can be compiled and linked into the client and server programs, so that they would call functions and do not deal with serialisation and network transfers themselves.
Android Binder does something similar, but instead of rpcgen, there are hidl and aidl.
But I cannot actually give you an example of a three-stage compilation: AIDL, Server, Client, because I have not found it, and I didn’t actually need it for anything.
But AIDL services can be called both from C++, and from Java, and somehow even from apps.
I wonder, how AIDL interfaces are getting to apk writers?
In any case, services not just have to be declared in the VINTF, but also registered when they start, with “service manager” or “hw service manager”. I don’t know how this is done, but I have seen a mention of this thing.
But there is more to it. There is such a thing as SP-HAL. SP stands for Same Process.
This means that you can just link to a library, or dlopen a library, and use its functions.
They do not have to actually do anything with hardware… I think.
In any case, I have no idea whether all libraries supplied by Android are a part of SP-HAL, or not. Again, all of this is very confusing and poorly documented. If you can explain this to me in a consistent way, feel free to email me.
1.3.5. Vendor, ODM, NDK, VNDK, Treble, apex, and linker namespaces
So, as mentioned in the previous section, Android cares a lot about abstraction barriers between different parties involved into the creation of a device. In most cases there are at least three parties:
- Google (framework)
- BBK/OnePlus (ODM)
- Qualcomm (vendor)
Google thinks that the interactions between them three should be if not tightly controlled, then at least well declared, and hence introduces VINTF.
Now believe me or not, but each of those parties has a partition allocated specifically for itself, and since Project Treble even two (suffixed _a and _b).
Wait, I didn’t say anything about partitioning on Android before.
This should be a whole section dedicated to it, but so far I can tell you that “vendor”, “odm”, and “system_ext” are separate partitions.
Moreover, at least on my phone, both vendor and odm are read-only images of an ext2 file system, and cannot be remounted read-write, only rebuilt.
Why is that?
Well, because the three parties do not communicate to ensure common library interface, and end up with API and ABI incompatibility issues.
So, the decision ended up being: give each party its own set of basic Android libraries, and make the dynamic linker ensure in runtime that programs associated with vendor, say, the camera provider services (a process run by init, which is allowed to open /dev/video0 and which services captured frames via a Binder service registered with the servicemanager) can only link dynamically and dlopen .so files from /vendor/lib64, even if it is given an LD_LIBRARY_PATH or LD_PRELOAD.
Linker also enforces restrictions on which libraries can be accessed by .so libraries shipped with apk files.
Now the important question: Which libraries can be used where? Does anybody have a list?
- TODO APEXes
But there is more to it. Since everyone is using similar libraries with slightly varying ABIs, there arose an need in more than three individual sets of libraries, and APEX appeared. Apex files are zip archives which are mounted by the
apexdon boot under the/apex/sub-tree, and can contain anything.Programs should be able to use those libraries (and resources) if the path is given to the program explicitly, but how do we give a specific set of libraries to a specific app which was not designed for this? Could be very convenient.
1.3.6. Properties
So, Android has a unified configuration system called “properties”.
Properties are essentially a global key-value database, accessible through the /proc filesystem, where they are represented as files, which allows them to have SELinux labels.
Properties are accessible to console programs with getprop, setprop, and __android_property_get, and through Java API.
They are stored in
/default.prop/system/build.prop/system/default.prop/vendor/build.prop- some other
*.propfiles
This part, surprisingly, actually has a decent HOWTO about it written by Google, so I will just link it here:
https://source.android.com/docs/core/architecture/configuration/add-system-properties
I will note that properties are divided into “system” properties and “vendor” properties, distinguished by specific prefixes.
ctl.odm. ctl.vendor. ctl.start$odm. ctl.start$vendor. ctl.stop$odm. ctl.stop$vendor. init.svc.odm. init.svc.vendor. ro.odm. ro.vendor. odm. persist.odm. persist.vendor. vendor.
ro. properties are writable only by init, or by the build system.
persist properties survive a reboot.
In the build system, properties are defined either with
PRODUCT_{PARTITION}_PROPERTIES (in the Makefile), or in TARGET_{PARTITION}_PROP (in separate files).
The biggest question is “why are properties different by partition?”. I don’t know, but if your program or app cannot read or write a property, probably it needs to be moved to a different partition.
Properties have SELinux labels, and those are defined in the files called property_contexts, for example ro.vendor.oplus.camera.frontCamSize u:object_r:vendor_camera_prop:s0
The full list of property contexts is probably somewhere under system/sepolicy or in Qualcomm directories.
Now the good idea would be to make an exhaustive list of all properties with explanation what those properties do.
The list can be obtained by running just getprop, but what the meanings…
Maybe at least make a wiki page?
1.3.7. TODO Graphics and SurfaceFlinger
I know nothing about this, except that there is a data structure called AHardwareBuffer, and you can manipulate it a lot.
SurfaceFlinger is the Android GUI system, I guess, the only one which can read/write /dev/drm or /dev/dri.
1.3.8. TODO Audio and AudioFlinger
I don’t know anything about them.
1.3.9. SELinux, SEAndroid, and permissions
- https://lineageos.org/engineering/HowTo-SELinux/
- https://source.android.com/docs/core/architecture/aidl/aidl-hals#sepolicy
- https://stackoverflow.com/questions/36790794/what-is-c512-c768-of-selinux-process
- https://rtx.meta.security/reference/2024/07/03/Android-system-apps.html
- https://github.com/SELinuxProject/selinux-notebook/
SELinux is decently documented by “SELinux Notebook”, and the basic principle is not too hard, but the implementation is very convoluted.
SEAndroid (a modification of SELinux for Android) is decently described here: https://lineageos.org/engineering/HowTo-SELinux/
Basically, SELinux works like this: source x target x operation => allow, and everything else is denied.
Firstly, the language is very confusing.
Essentially, there is not difference between labels on source and target, so I am calling them “labels”.
This is the most visible in the following example: suppose a project A wants to kill project B, then a check would be scontext=label_a tcontext=label_b class=process acton=kill.
When a process B wants to kill process A, the action would be the same, but scontext and tcontext would be reversed.
However, you may often see the words “domain” and “context”, which are basically the same thing – labels.
In Android, many things have labels:
- processes/apps
- properties
- files
- pseudo-files
Apps are labelled in files called seapp_context, properties are labelled in property_context, and files in file_context.
Permissions are given in /.te files.
Of course, writing all permissions and re-flashing the system is a pain, so there is a tool called sepolicy-inject, which allows injecting policies into the running kernel.
File contexts can be changed with chcon, but process/app contexts have to be rebuilt.
SELinux has essentially seven types of statements:
allow:: permit an operation and print its denial in logneverallow:: prohibit an operationauditallow:: allow an operation but print logdontaudit:: prohibit an operation and do not print its denial in logdefine:: define a macro with arguments which will expand to somethingtype:: define a new labeltypeargument:: add property to a label
define is tricky, because it usually allows a lot of permissions, while prohibiting (with neverallow) some actions which can only be allowed via this macro
This make a naive policy of “Enable SELinux, look for denials in the log (dmesg), allow as needed” impractical, because while you know that you need to allow something, you do not necessarily know the correct macros for allowing that operation, and allowing the actions directly will be prohibited via neverallow.
For the list of macros, see:
system/sepolicyfind hardware -name '*.te'
A convenient pattern for debugging SELinux is to find an object you are interested in (say, a camera app), give it a separate label (say mycamera_app) in seapp_contexts, and look at dmesg for the actions denied to it.
1.3.10. Partitions, boot process, fastboot and recovery
As a last topic in this chapter, I want to touch partitions and Android boot process.
In fact, in most operating system manuals this is the first chapter, combined with “how to install an OS”, but Android is a little different in that:
- most people do not to install Android themselves,
- installing Android is difficult, the whole chapter 1.4 is dedicated to this,
- boot process and partition details vary significantly between different manufacturers
In principle we know how a system should boot:
- BIOS finds a bootloader
- bootloader finds an OS kernel and root file system
- bootloader boots the OS kernel, passing the root file system location as a command-line
- kernel mounts the root filesystem, sometimes additional file systems, and starts the init, which does all the initialisation work
But Android is different. Indeed, there are partitions, and in theory they are on the MMC storage, there is a bootloader and a kernel, but how exactly they are implemented, seems to depend on the manufacturer a lot.
It should be possible to see the full list of partitions on a device … But the method how see them differs from a manufacturer to a manufacturer.
And what is also bad, their amount is significantly greater than on a normal OS.
/dev/block/by-name # ls
ALIGN_TO_128K_1    fsc             oplusdycnvbk    storsec
ALIGN_TO_128K_2    fsg             oplusreserve1   super
DRIVER             hyp_a           oplusreserve2   toolsfv
abl_a              hyp_b           oplusreserve3   tz_a
abl_b              imagefv_a       oplusreserve4   tz_b
aop_a              imagefv_b       oplusreserve5   tzsc
aop_b              init_boot_a     oplusstanvbk_a  uefi_a
aop_config_a       init_boot_b     oplusstanvbk_b  uefi_b
aop_config_b       keymaster_a     param           uefisecapp_a
apdp               keymaster_b     persist         uefisecapp_b
apdp_full          keystore        qmcs            uefivarstore
apdpb              last_parti      qupfw_a         userdata
bluetooth_a        limits          qupfw_b         vbmeta_a
bluetooth_b        limits-cdsp     qweslicstore_a  vbmeta_b
boot_a             logdump         qweslicstore_b  vbmeta_system_a
boot_b             logfs           rawdump         vbmeta_system_b
cdt                mdcompress      recovery_a      vbmeta_vendor_a
connsec            mdm1oemnvbktmp  recovery_b      vbmeta_vendor_b
cpucp_a            mdtp_a          rtice           vendor_boot_a
cpucp_b            mdtp_b          rticmpdata_a    vendor_boot_b
ddr                mdtpsecapp_a    rticmpdata_b    vm-bootsys_a
devcfg_a           mdtpsecapp_b    sda             vm-bootsys_b
devcfg_b           metadata        sdb             vm-data
devinfo            misc            sdc             vm-persist
dinfo              modem_a         sdd             xbl_a
dip                modem_b         sde             xbl_b
dsp_a              modemst1        sdf             xbl_config_a
dsp_b              modemst2        secdata         xbl_config_b
dtbo_a             multiimgoem_a   shrm_a          xbl_ramdump_a
dtbo_b             multiimgoem_b   shrm_b          xbl_ramdump_b
engineering_cdt_a  multiimgqti_a   splash_a        xbl_sc_logs
engineering_cdt_b  multiimgqti_b   splash_b        xbl_sc_test_mode
featenabler_a      ocdt            splash_odm
featenabler_b      oplus_sec_a     spunvm
frp                oplus_sec_b     ssd
The _a/_b partitions are an implementation of a system called “Project Treble”, which was expected to help phone manufacturers deliver updates to their phones faster.
The idea was that system, odm, and vendor partitions could be updated independently, and if an update fails, the phone reboots using a dual partition _b if _a failed, and vice-versa.
In theory this would allow booting separate operating system images while keeping the driver partitions odm and vendor intact.
I am not sure this actually works anywhere except Google’s reference devices (Pixel).
So, in theory, a Treble-enabled phone has at least two system “root” partitions to boot, but there are actually more.
Many devices are able to boot into
- bootloader
- fastboot
- fastbootd
- edl
- recovery
- sideload
- system
The bootloader, in theory, should be independent from the MMC storage and be bootable regardless of a system installed. Fastboot is a “debugging interface”, usable through a command-line tool “fastboot”, which should allow re-flashing the system or individual partitions. It is often combined with Fastboot into the same interface. Usually it is also not kept in the main MMC.
Recovery is a stripped-down version of Android, using the same kernel and loadable into ram filesystem. It usually has some kind of interface, but its main purpose is to be able to repair Android in case it is broken. Together with recovery, there is also “fastbootD” (note the D). It is a system implementing the fastboot protocol, but running from a booted system, such as recovery. It is used to flash partitions which are not real partitions, but are read-only files (file system images) mounted loopback.
Note that the list of partitions above does not have a system partition.
This is because the system partition is not real.
For some reason, Android really likes having different components of the boot process as separate partitions.
For example, on many phones you install Android like this:
fastboot flash boot boot.img
fastboot flash init_boot init_boot.img
fastboot flash vendor_boot vendor_boot.img
fastboot flash dtbo dtbo.img
fastboot flash recovery recovery.img
fastboot reboot sideload-auto-reboot
adb sideload lineage*.zip
fastboot reboot sideload might be replaced with fastboot reboot recovery and tapping “install update”.
bootis essentially the kernelinit_bootis the ramfs with initial userspace for the booted kernelvendor_bootis a similar ramfs with vendor filesdtbois the “device tree” describing the system you are running onrecoveryis also a ramfs with a the few recovery options and an interface to install the main system
1.3.12. Important points in Android system
/system:: system files/system_ext:: emm… more system files?/odm:: brand-related (say OnePlus) things/vendor:: chipset manufacturer (say, Qualcomm) related things/data:: data/data/data/:: app data. Usually only one sub-directory there is available for an app to write files, say/data/data/com.termux/data/data/adb:: directory to place adb-related files/data/tombstones:: crash minidumps/data/vendor/camera:: camera intermediate directory and debug dumping directory
/apex:: sub-tree to mount specific sets of versions of system libraries, for compatibility reasons- various
*etc*directories :: configuration files - various
*lib64*directories :: shared libraries - various
*bin*directories :: binary executable files
1.3.13. TODO More about partitions and storage
- Background reading: https://www.kernel.org/doc/Documentation/filesystems/sharedsubtree.txt
- https://android.stackexchange.com/questions/203951/how-can-i-make-a-symlink-or-equivalent-inside-storage-emulated-0/
- sdcardfs : https://www.xda-developers.com/diving-into-sdcardfs-how-googles-fuse-replacement-will-reduce-io-overhead/
- https://android.stackexchange.com/questions/197959/why-partition-gets-unmounted-automatically-after-some-time/200449#200449
- https://android.stackexchange.com/questions/214288/how-to-stop-apps-writing-to-android-folder-on-the-sd-card/
- https://android.stackexchange.com/questions/217741/how-to-bind-mount-a-folder-inside-sdcard-with-correct-permissions/217936#217936
- https://developer.android.com/training/data-storage#scoped-storage
1.4. Using LineageOS on your own device
After you have progressed far enough to build Android for some device, you will want to make it run on your device.
Smartphones are just computers, you can boot a lot of different stuff on them, but it does not mean that everything which boots is usable, you need to supply correct drivers in order for the device to work properly.
Also a bare-bones system is not very productive, you will probably want to install your own software on it.
Android software comes both as Linux binaries, installable into bin directories manually, and as apk files installable by tapping onto the apk file in the file manager.
1.4.1. Android Debugging Bridge (ADB) and shell commands
adb
ADB is a tool to manage an Android device via command-line. It is powered by
adbd(ADB daemon), running on the device and implemented whatever the desktopadbcommand tells it.ADB can do a lot of interesting things.
adb shellwill run a mksh shell on the deviceadb logcatwill run a
adb forwardwill forward sockets between the phone and your development machineadb pullandadb pushwill download and upload files from the deviceadb reboot recoverywill reboot to recovery to install a new system or reset an old oneadbcan run over USBadb -s <deviceid>selects a device if you have manyadb rootwill run the next shell as root (no need for magisk)adb sideloadwill install files onto the device, including bothapkfiles and Android images prepared by the build system, and even some randomzipfiles with shady things, such as Magisk
You can include calls to
adb -s <deviceid> shell 'command line'into your scripts to automate a lot of operations with the phone. For example,adb shell 'input tap 100 100'will imitate a tap to a device.In general you can do quite a lot through Android command-line.
You need to activate ADB in the device settings, or add a few parameters changing the properties in the device Makefile.
PRODUCT_PROPERTY_OVERRIDES += \
    ro.debuggable=1 \
    persist.service.adb.enable=1 \
    persist.service.debuggable=1 \
    persist.sys.usb.config=adb \
    ro.adb.secure=0
fastboot
fastbootis a command similar toadb, but intended to work with the bootloader, not a running system (even if in a recovery mode).You can use it to flash individual partitions on a system not having a full-featured
adbdrunning. This usually happens when your system is broken.- Using recovery.
If you boot into recovery, either from bootloader, or from system, or by pressing a magic key combo, you will find out that quite a few operations can be done in recovery. For example, you can browse the file system and extract some data, if your system is not booting.
Pay attention to
dmesgand/tmp/recovery.log.In order to connect to recovery with
adb, you need to disableadbsecurity though.On most systems it means that you need to run the build system like
WITH_ADB_INSECURE=true bunch xigua, but this might be different on your Android. - on-device commands (
am,pm,settings,input)
pmmanages packages, for examplepm list packageswill produce package names,pm list permissionswill list permissions.amis the activity manager, using it you an start app activities, even those which are otherwise inaccessible from the default app interface.For example, you can restart “Airplane Mode” by typing:
#!/system/bin/sh
  settings put global airplane_mode_on 1
  sleep 1
  am broadcast -a android.intent.action.AIRPLANE_MODE
  sleep 1
  settings put global airplane_mode_on 0
  sleep 1
  am broadcast -a android.intent.action.AIRPLANE_MODE
1.4.2. Android.bp and Android.mk
Android has suffered a series of transformations from one build system to another, and the current one is sort of a mess.
I have not personally met Bazel, even though it is believed to be somewhere inside there too, but there are Android.mk and Android.pb to be aware of.
Both are a variation of classical UNIX Make, you define targets, connect them with dependencies, and the system traverses the dependency tree and builds the resulting object.
Android.mk is essentially a Makefile, but it is parsed by ckati into a Ninja script rather than executing the statements directly.
Android.bp is also parsed into Ninja, but by a different tool.
You probably will not have to tweak Ninja scripts at all, but Make and Android.bp files are interesting, and you will probably also not call ckati or soong (the proper name of the build system) directly.
Good for us, Android.bp kinds of targets are well documented:
- Syntax :: https://source.android.com/docs/setup/reference/androidbp
- Modules :: https://ci.android.com/builds/submitted/13288697/linux/latest/view/soong_build.html
Android.mk is not so well documented, especially since it is expected to be phased out eventually.
Nevertheless, Make files are still very important, as they are used for device definitions, and you will have to write our own one (or adapt someone else’s) in order to successfully port Lineage.
1.4.3. Important points in Android source tree
device:: mostly things related to a particular device, say, Samsung Galaxy S10device/oneplus/sm8550-common:: source files related to all devices by OnePlus built on Qualcomm sm8550device/oneplus/xigua:: source files related to a particular device. Will most likely inherit from acommon-phone.mkprofile
vendor:: mostly related to things extracted from original firmware/vendor/oneplus/sm8550-common:: binaries from original firmware, which are chipset-related/vendor/oneplus/xigua:: ditto, concrete device related/vendor/lineage/...:: despite being invendor, not really binaries, actually I don’t know what it is, it makes little sense
kernel:: kernel-related directoriesframeworks:: system libraries available to Java appspackages:: pre-built appshardware:: em… some more drivers, but not chipset-related? I am confusedexternal:: things used in Android transparently, for example, Linux libraries, such as libxml2system:: system libraries and services unavailable to Java apps
1.4.4. Creating a module for your own device
In general, you need three components for a device:
- Device module (say,
device/oneplus/xigua.mk) - Device binaries (say,
vendor/oneplus/xigua.mk), usually extracted from an official build - Device kernel
- Kernel itself
kernel/oneplus/sm8550 - Modules
kernel/oneplus/sm8550-modules - Device trees (dtb files)
kernel/oneplus/sm8550-devicetrees
- Kernel itself
Kernel, modules, and dtbs is often published by the manufacturer, for example:
But do not be so naive to believe that just plugging those into your LineageOS tree will make it work instantly.
1.4.5. Device-specific module
Let us have a look at the files in a typical device module: device/oneplus/xigua/.
# ls
Android.bp
AndroidProducts.mk
BoardConfig.mk
board-info.txt
device.mk
extract-files.py
lineage.dependencies
lineage_xigua.mk
odm.prop
overlay
overlay-lineage
proprietary-files.txt
proprietary-firmware.txt
setup-makefiles.py
system_ext.prop
vendor.prop
As far as I understand, their meaning is the following:
AndroiProducts.mk:: defines a “device” for the purposes of the Android build system.lineage_xigua.mk:: defines a module, which actually defines the deviceBoardConfig.mk:: defines … well, I don’t know what it defines and what is the need for it to be separate fromlineage_xigua, but it includes Makefile fromvendor/oneplus/xigua, which is the module for pre-built drivers, so it is obviously very important.device.mk:: seemingly also important, because defines a lot of device properties on part withlineage_xigua.mkandBoardConfig.mk. I have no idea why there are three files.lineage.dependencies:: tells the system that your device is actually designed on the basis of a System-on-Chip which is used for other devices as well and some drivers can be sharedboard-info.txt:: I have no idea what it is, but it includes the code name of my SoCextract-files.py:: extracts binaries from an unpacked original firmware and post-processes them.setup-makefiles.py:: just callsextract-files.pyproprietary-files.txt:: a file from whichextract-files.pytakes information on which files to extractproprietary-firmware.txt:: I have no idea what it is, but it is probably somehow connected to the partitions on the device which are not Open Source, such as modem firmware{overlay,overlay-lineage}:: no idea what they are forAndroid.bp:: empty
If you want to port Android to a device which is to an extent similar to some other device already supported, chances are that you only need to find the true board name to inherit in BoardConfig.mk, and adjust the parameters in the files to match your device.
1.4.6. Extracting binary files
Extracting the correct binary files is very important for making the device run.
In order to do that, it is important to understand which files serve which purpose and correspond to which packages. As has already been said, there is no way to identify that using normal Android means, although I suspect that hacking something on the basis of xattrs should be possible.
Nevertheless, if you look at proprietary-files.txt, and extract-files.py, you will see that those files do more than just copy files into a temporary directory.
There are a lot of examples on how to rewrite files documented in tools/extract-utils/templates/single-device/extract-files.py, but I will note the few most important here.
.regex_replace(from, to)replaces a string.binary_regex_replace(bytes.fromhex('cafebabe'),bytes.fromhex('deadbeef'))replaces a binary sequence.replace_needed('libfoo.so', 'libbar.so')replaces a dependency.fix_soname()fixes an SONAME if the.sometadata
The last two are very important for the case when you need to link an app to an original version of a library, and copy it into /odm/lib64/libfoo_vendor.so.
1.4.7. TODO dtb and dtbo
- https://docs.qualcomm.com/doc/80-70017-3/topic/features.html
- https://wiki.postmarketos.org/wiki/Device_Tree_(dtb)
I don’t know what to write here, I am ignorant, but I never had to write a device tree (dtb), or overlay it with some customisations with a device tree overlay (dtbo).
Look at the examples of real device trees in kernel/<manufacturer>/<chip>-devicetrees
You can try decompiling your own phone device trees:
#!/bin/bash
mkdtboimg dump dtbo.img -b mydtb
for i in mydtb.* ; do
  dtc -I dtb -O dts "$i" -o "${i/mydtb/mydts}"
done
But the result will be megabytes in size.
1.4.8. TODO AIDL services
Missing place.
Presumably you need to write an “*.aidl” file, add it to Soong, then write the server and the client for the service and include the headers generated by Soong. But that is as much as I know.
But there seems to be at least one working example: https://github.com/Heydarchi/AIDL-HAL-Service
1.4.9. Writing native code
To begin is always the hardest thing for a programmer. You change one line in a huge project, and the crystal edifice shatters into myriads of tiny shards. At best itn starts to fail building. At worse, it builds, but begins to misbehave in a subtle way. At worst, it works, seemingly, as intended, but either leaks memory or becomes horribly insecure.
This is why having an introductory manual is so important.
- Soong
The easiest way to start is to add a native binary into the Android tree. The intuition behind doing that can be trained by looking at how some other mostly alien to Android projects are built. For example, have a look at
./external/bzip2.The first thing you should notice is that the native build system for
bzip2is not used at all. The source files ofbzip2are used directly fromAndroid.bp. Luckily this file is small and easy to understand.Let us add a separate native binary:
diff --git a/Android.bp b/Android.bp
index d63fe4a..d1ed8da 100644
--- a/Android.bp
+++ b/Android.bp
@@ -104,3 +104,17 @@ cc_binary {
	 "bzcat",
     ],
 }
+
+cc_binary {
+    name: "mine_test",
+    host_supported: true,
+    srcs: ["mine_test.cc"],
+    cflags: [
+
+    ],
+    include_dirs: [
+    "system/libhidl/base/include",
+    ],
+
+
+}
+
We also need to tell the build system not not just build the file, but also install it, and to do that, we are adding a line to
shell_and_utilities/Android.bp:diff --git a/shell_and_utilities/Android.bp b/shell_and_utilities/Android.bp index 0a1f7c5a2..83a20a619 100644 --- a/shell_and_utilities/Android.bp +++ b/shell_and_utilities/Android.bp @@ -18,6 +18,7 @@ phony { "awk", "bc", "bzip2", + "mine_test", "cpu-target-features", "fsck.exfat", "ldd",Yes, we are adding the binary (target), not the project name.
This way you can start shipping your own code in Android right away, and at least
rootwill be able to use it. This already makes your system much more usable than before.I am not exactly sure how to add a separate project, not just plug a binary into an existing one, but it should be as easy as:
- making a directory under
./external/projectname - writing an
Android.bp - adding a dependency on your project from some installation-related target, such as
shell_and_utilities
- making a directory under
- Custom building
You can use Lineage’s pre-built compilers, or even not Lineage’s, to make your own code without Soong, and even substitute them for your system-wide ones and build your own binaries independently of Soong.
For example:
AS="/home/lockywolf/OfficialRepos/LineageOS-23/prebuilts/gcc/linux-x86/aarch64/aarch64-linux-android-4.9/bin/aarch64-linux-android-as"
I1="/home/lockywolf/OfficialRepos/LineageOS-23/prebuilts/gcc/linux-x86/host/x86_64-linux-glibc2.17-4.8/sysroot/usr/include/"
I2="/home/lockywolf/OfficialRepos/LineageOS-23/prebuilts/gcc/linux-x86/host/x86_64-linux-glibc2.17-4.8/sysroot/usr/include/x86_64-linux-gnu/"
I3="/home/lockywolf/OfficialRepos/LineageOS-23/prebuilts/gcc/linux-x86/host/x86_64-linux-glibc2.17-4.8/sysroot/usr/include/i386-linux-gnu/"
LD="/home/lockywolf/OfficialRepos/LineageOS-23/prebuilts/gcc/linux-x86/aarch64/aarch64-linux-android-4.9/bin/aarch64-linux-android-ld"
myCC=arm64-tcc -I$(I1) -I$(I2) -I$(I3)

01_helloworld/hello: 01_helloworld/hello.s
        $(AS) -o 01_helloworld/hello.o 01_helloworld/hello.s
        $(LD) -o 01_helloworld/hello 01_helloworld/hello.o
03_c-inserts/02_timedate-static.o: 03_c-inserts/02_timedate-static.c Makefile
        $(myCC) -c $< -o $@
In this example I am using
TCCas an example of an external compiler. Then push your file into/data/local/tmpand run it.You can also copy a line from the Soong build log and adjust it as you need.
PWD=/proc/self/cwd /usr/bin/ccache prebuilts/clang/host/linux-x86/clang-r547379/bin/clang++ -Wl,out/soong/.intermediates/bionic/libc/crtend_android/android_arm64_armv8-2a-dotprod/crtend_android.o -Wl,out/soong/.intermediates/bionic/libc/crtbegin_dynamic/android_arm64_armv8-2a-dotprod/crtbegin_dynamic.o -nostdlibinc -Werror=implicit-function-declaration -D__BIONIC_DEPRECATED_PAGE_SIZE_MACRO -O2 -Wall -Wextra -Winit-self -Wpointer-arith -Wunguarded-availability -Werror=date-time -Werror=int-conversion -Werror=pragma-pack -Werror=pragma-pack-suspicious-include -Werror=sizeof-array-div -Werror=string-plus-int -Werror=unreachable-code-loop-increment -Wno-error=deprecated-declarations -Wno-c23-extensions -Wno-c99-designator -Wno-gnu-folding-constant -Wno-inconsistent-missing-override -Wno-error=reorder-init-list -Wno-reorder-init-list -Wno-sign-compare -Wno-unused -DANDROID -DNDEBUG -UDEBUG -D__compiler_offsetof=__builtin_offsetof -D__ANDROID_UNAVAILABLE_SYMBOLS_ARE_WEAK__ -faddrsig -fdebug-default-version=5 -fcolor-diagnostics -ffp-contract=off -fno-exceptions -fno-strict-aliasing -fmessage-length=0 -gsimple-template-names -gz=zstd -no-canonical-prefixes -fdebug-prefix-map=/proc/self/cwd= -ftrivial-auto-var-init=zero -Wno-unused-command-line-argument -g -ffunction-sections -fdata-sections -fno-short-enums -funwind-tables -fstack-protector-strong -Wa,--noexecstack -D_FORTIFY_SOURCE=2 -Wstrict-aliasing=2 -Werror=return-type -Werror=non-virtual-dtor -Werror=address -Werror=sequence-point -Werror=format-security -Wno-enum-compare -Wno-enum-compare-switch -Wno-null-pointer-arithmetic -Wno-null-dereference -Wno-pointer-compare -Wno-final-dtor-non-final-class -Wno-psabi -Wno-null-pointer-subtraction -Wno-string-concatenation -Wno-deprecated-non-prototype -Wno-unused -Wno-deprecated -Wno-error=format -march=armv8.2-a+dotprod -target aarch64-linux-android10000 -fPIE -Wimplicit-fallthrough -D_LIBCPP_ENABLE_THREAD_SAFETY_ANNOTATIONS -Wno-gnu-include-next -fvisibility-inlines-hidden -Iexternal/bzip2 -D__LIBC_API__=10000 -D__LIBM_API__=10000 -D__LIBDL_API__=10000 -Iprebuilts/clang/host/linux-x86/clang-r547379/android_libc++/platform/aarch64/include/c++/v1 -Iprebuilts/clang/host/linux-x86/clang-r547379/include/c++/v1 -Ibionic/libc/async_safe/include -Isystem/logging/liblog/include -Ibionic/libc/system_properties/include -Isystem/core/property_service/libpropertyinfoparser/include -Ibionic/libdl/include_private -isystem bionic/libc/include -isystem bionic/libc/kernel/uapi/asm-arm64 -isystem bionic/libc/kernel/uapi -isystem bionic/libc/kernel/android/scsi -isystem bionic/libc/kernel/android/uapi -Werror -flto=thin -fsplit-lto-unit -std=gnu++20 -fno-rtti -Isystem/core/include -Isystem/logging/liblog/include -Isystem/media/audio/include -Ihardware/libhardware/include -Ihardware/libhardware_legacy/include -Ihardware/ril/include -Iframeworks/native/include -Iframeworks/native/opengl/include -Iframeworks/av/include -Werror=bool-operation -Werror=dangling -Werror=format-insufficient-args -Werror=implicit-int-float-conversion -Werror=int-in-bool-context -Werror=int-to-pointer-cast -Werror=pointer-to-int-cast -Werror=xor-used-as-pow -Wimplicit-int-float-conversion -Wno-void-pointer-to-enum-cast -Wno-void-pointer-to-int-cast -Wno-pointer-to-int-cast -Werror=fortify-source -Wno-unused-variable -Wno-missing-field-initializers -Wno-packed-non-pod -Werror=address-of-temporary -Werror=incompatible-function-pointer-types -Werror=null-dereference -Werror=return-type -Wno-tautological-constant-compare -Wno-tautological-type-limit-compare -Wno-implicit-int-float-conversion -Wno-tautological-overlap-compare -Wno-deprecated-copy -Wno-range-loop-construct -Wno-zero-as-null-pointer-constant -Wno-deprecated-anon-enum-enum-conversion -Wno-deprecated-enum-enum-conversion -Wno-error=pessimizing-move -Wno-non-c-typedef-for-linkage -Wno-align-mismatch -Wno-error=unused-but-set-variable -Wno-error=unused-but-set-parameter -Wno-error=deprecated-builtins -Wno-error=deprecated -Wno-error=invalid-offsetof -Wno-vla-cxx-extension -Wno-cast-function-type-mismatch -fcommon -Wno-format-insufficient-args -Wno-misleading-indentation -Wno-bitwise-instead-of-logical -Wno-unused -Wno-unused-parameter -Wno-unused-but-set-parameter -Wno-unqualified-std-cast-call -Wno-array-parameter -Wno-gnu-offsetof-extensions -Wno-pessimizing-move -MD -MF out/soong/.intermediates/external/bzip2/lwf_test/android_arm64_armv8-2a-dotprod/obj/external/bzip2/lwf_test.o.d -I./system/libhidl/base/include/ -o lwf_test external/bzip2/lwf_test.ccIf you want to replace an existing binary, you probably can do it on a writable filesystem, such as
/system, but not on/vendor/or/odm/.However, you can push the binary to
/data/local/tmpandmount -o bindit over the old one. - ndk-build
There is a way to build binaries for Android using the special command
ndk-build, shipped with Android Sdk (not LineageOS).~/Android/Sdk/ndk/27.0.12077973/build/ndk-buildI have not used it too much, but it might work for you.
1.4.10. Android apps
- Pre-installed apps, permissions, and interaction of system with apps
- https://developer.android.com/topic/architecture?hl=en
- https://rtx.meta.security/reference/2024/07/03/Android-system-apps.html
- https://android.stackexchange.com/questions/210139/what-is-the-u-everybody-uid/
- https://source.android.com/devices/storage#runtime_permissions
- https://android.stackexchange.com/questions/208523/how-androids-permissions-mapping-with-uids-gids-works/208982#208982
There is not much to write here, luckily, writing Android apps is a well documented process, but it is worth mentioning a few words about pre-installing apps into Android.
Why exactly would you want to pre-install apps into Android? Because pre-installed apps are more privileged than installed externally.
In particular, there are different levels of “privileges”, in particular this article speaks about it better: https://rtx.meta.security/reference/2024/07/03/Android-system-apps.html
Overall, apps are pre-installed into android by placing them into ~packages/app∼ and adding something like
PRODUCT_PACKAGES += \
    PackageName
into your device makefile.
However, rebuilding and re-flashing the whole system for a single
apkdevelopment iteration is horrible, so there is a better way:adb push my_app.apk /system_ext/priv-app/and restart the app. But in order for this to work, yourapkneeds to be signed with a “platform key”:java -jar ~/LineageOS-23/out/host/linux-x86/framework/apksigner.jar sign --in ./dist/OplusCamera-15.apk -out ./dist/OplusCamera-15.apk.signed --cert ~/LineageOS-23/build/make/target/product/security/platform.x509.pem --key ~/LineageOS-23/build/make/target/product/security/platform.pk8 --v3-signing-enabled false
- TODO Developing Android Apps
This section is not very well written, because it is too huge, I just listed a few points to stumble over.
- Unset _JAVA_OPTIONS
Because Android Studio is shit and broken.
- Delete all Android Studio data when updating
Otherwise very weird symptoms occur
- ~/.config/
- when you change applicationId, it is not enough to re-sync Gradle
You also have to manually delete all run configurations and re-sync, otherwise weird errors occur. ~/.config/Google/AndroidStudio2024.2/
- When you create emulated devices, you need to restart android studio
- Sometimes adb server fails
The symptom is
Adb connection Error:EOF Cannot reach ADB server, attempting to reconnect daemon not running; starting now at tcp:5037
I fixed this by switching from openscreen to bonjour in Debugger settings. This also makes the emulator start/stop buttons work again.
- View vs Fragments
- Android’s toolkit, Activities, Views, and Fragments
- Unset _JAVA_OPTIONS
1.4.11. Android logging and crash reporting
Of course, when you are writing code, everything can go wrong. You need to debug it.
Basically, in software there are just two ways of debugging: logging and debuggers.
The following are the main log sources in Android:
dmesglogcat/data/tombstones/tmp/recovery.log(in recovery)
Quoting Lineage’s guide:
There are various circular buffers stored by the logcat process, and they can be accessed using the -b option, with the following options available: radio: Views the buffer that contains radio/telephony related messages. events: Views the interpreted binary system event buffer messages. main: Views the main log buffer (default), which doesn’t contain system and crash log messages. system: Views the system log buffer (default). crash: Views the crash log buffer (default). all: Views all buffers. default: Reports main, system, and crash buffers.
For apps crashing, logcat is your best choice.
For native code, look at the “tombstones”, at least they are going to have stack traces.
1.4.12. Attaching debuggers
- Native code
You can attach
lldbto both apps and native processes. You can also attach a Java debugger to and app processes, but I did not do it.The basic idea is the following: you launch
lldb-serveron the device, and the Lineage tree has several pre-built ones. Then you launchlldbon your machine, type a few magic lines, and it connects to thelldb-server. From there you can either launch a new process, or (more likely) attach to an existing one.adb push prebuilts/clang/host/linux-x86/clang-r574158/runtimes_ndk_cxx/aarch64/lldb-server /data/local/tmp/ adb shell 'cd /data/local/tmp ; ./lldb-server platform --listen "*:54321" --server'prebuilts/clang/host/linux-x86/clang-r574158/bin/lldb platform select remote-android (gives the "Connected: no" message) platform connect connect://emulator-5554:54321 file target; b main; r
Important: most Java processes will require passing additional commands for the debugger to not break in weird ways:
args+=(-o "process handle --pass true --stop false --notify false SIGSEGV" -o "process handle --pass true --stop false --notify false SIGBUS" -o "settings set plugin.jit-loader.gdb.enable off" -o 'process handle --pass true --stop true --notify true SIGCHLD' -o 'settings set plugin.jit-loader.gdb.enable off' -o 'process status')
In theory you can also use
gdb-server: https://github.com/hugsy/gdb-static - TODO Java code
For Java, there is some way to attach a debugger from Android Studio to a running app, but I did no use this method.
In theory, JADX has debugging capabilities and can connect to running Android Java apps, but I was not successful with it.
1.4.13. TODO SDK and NDK versioning and other API fiddling
Okay, I do not really understand this, but there are some compatibility issues between different versions of Android, SDK and NDK. This is so convoluted that I do not know how to understand it, so you have to search.
1.5. Transplanting an app to LineageOS
Suppose you want to make some app work on your LineageOS. Actually, why would it not work on your phone by default?
Well, mostly for two reasons: (1) it expects to have private app permissions, (2) it is written for a specific version of Android, using manufacturer’s particular APIs.
(1) can be worked around by signing the app with the platform key and installing with adb, but (2) requires creativity.
1.5.1. General development iterations and tricks to shorten them
When you want to port an app for LineageOS, you usually only have two options: (1) modify the app, (2) modify the Operating System.
In both of those cases you want to make your development iterations as short as possible.
I already mentioned this, but it is never hurts to repeat:
- apps can be signed with the platform key and copied
- native libraries can be copied to
/data/local/tmpand mounted over - selinux permissions can be injected using
sepolicy-inject
1.5.2. First debugging steps
First of all, you need to make sure that working with code is convenient, and stupid useless security theatre is not getting in the way.
So, the first thing you need to do is turn off ADB authentication to avoid tapping stupid permission windows on each re-flash.
go to vendor/lineage and apply the patch.
diff --git a/config/common.mk b/config/common.mk
index abc2b9ec..69aff098 100644
--- a/config/common.mk
+++ b/config/common.mk
@@ -33,7 +33,7 @@ ifdef WITH_ADB_INSECURE
 PRODUCT_SYSTEM_DEFAULT_PROPERTIES += ro.adb.secure=0
 else
 # Enable ADB authentication
-PRODUCT_SYSTEM_DEFAULT_PROPERTIES += ro.adb.secure=1
+PRODUCT_SYSTEM_DEFAULT_PROPERTIES += ro.adb.secure=0
 endif

 # Disable extra StrictMode features on all non-engineering builds
Also, I added the following lines to my device/oneplus/xigua/device.mk:
PRODUCT_PROPERTY_OVERRIDES += \
    ro.debuggable=1 \
    persist.service.adb.enable=1 \
    persist.service.debuggable=1 \
    persist.sys.usb.config=adb \
    ro.adb.secure=0
Again, this is making a lot of fiddling with the settings after each system reboot unnecessary.
1.5.3. Log-based debugging, tombstones, and simple tools
Some debugging does not require complicated techniques.
Very often you can see what an app needs right into the adb logcat output.
In order to make your life simpler, you can edit the Android log-printing functions to produce more information.
For example, when I was debugging “Vendor Tags”, I added the following line to the code:
 status_t VendorTagDescriptor::lookupTag(const String8& name, const String8& section,
                                         /*out*/ uint32_t* tag) const {
+  ALOGE("my-own:%s: Section: '%s', name: '%s'.", __FUNCTION__, section.c_str(), name.c_str());
This line appears in “ADB logcat” and is easy to filter.
ALOGE is essentially Java’s Log.e(TAG, message);
Install your app, run it, look at logcat, dmesg and /data/tombstones.
Often it will tell you what is missing.
Another “naive”, but useful and practical tools are grep (or ripgrep) and strings.
Those let you search binary files for the presence of content.
Look for something in the log, grep for this string, find out which binary contains it.
1.5.4. Linker and dlopen dependency mapping
A lot of problems with an app running on Lineage are coming from Lineage just missing some libraries that the manufacturer is shipping in his firmware.
Firstly, you can unpack the apk with apktool and examine its shipped JNI and native libraries:
AndroidManifest.xml build/ res/ unknown/ AndroidManifest.xml.orig dist/ scratch.smali META-INF/ kotlin/ smali/ apktool.yml lib/ smali_classes1/ assets/ original/ smali_classes2/
look at the lib directory and see which libraries the apk is carrying.
You can examine those libraries with objdump, readelf, and ldd.
Unfortunately, Android’s ldd is unreliable, and it is listing all possible dependencies, transitively.
But readelf -d libfoo.so | grep NEEDED will give you a list of dependencies.
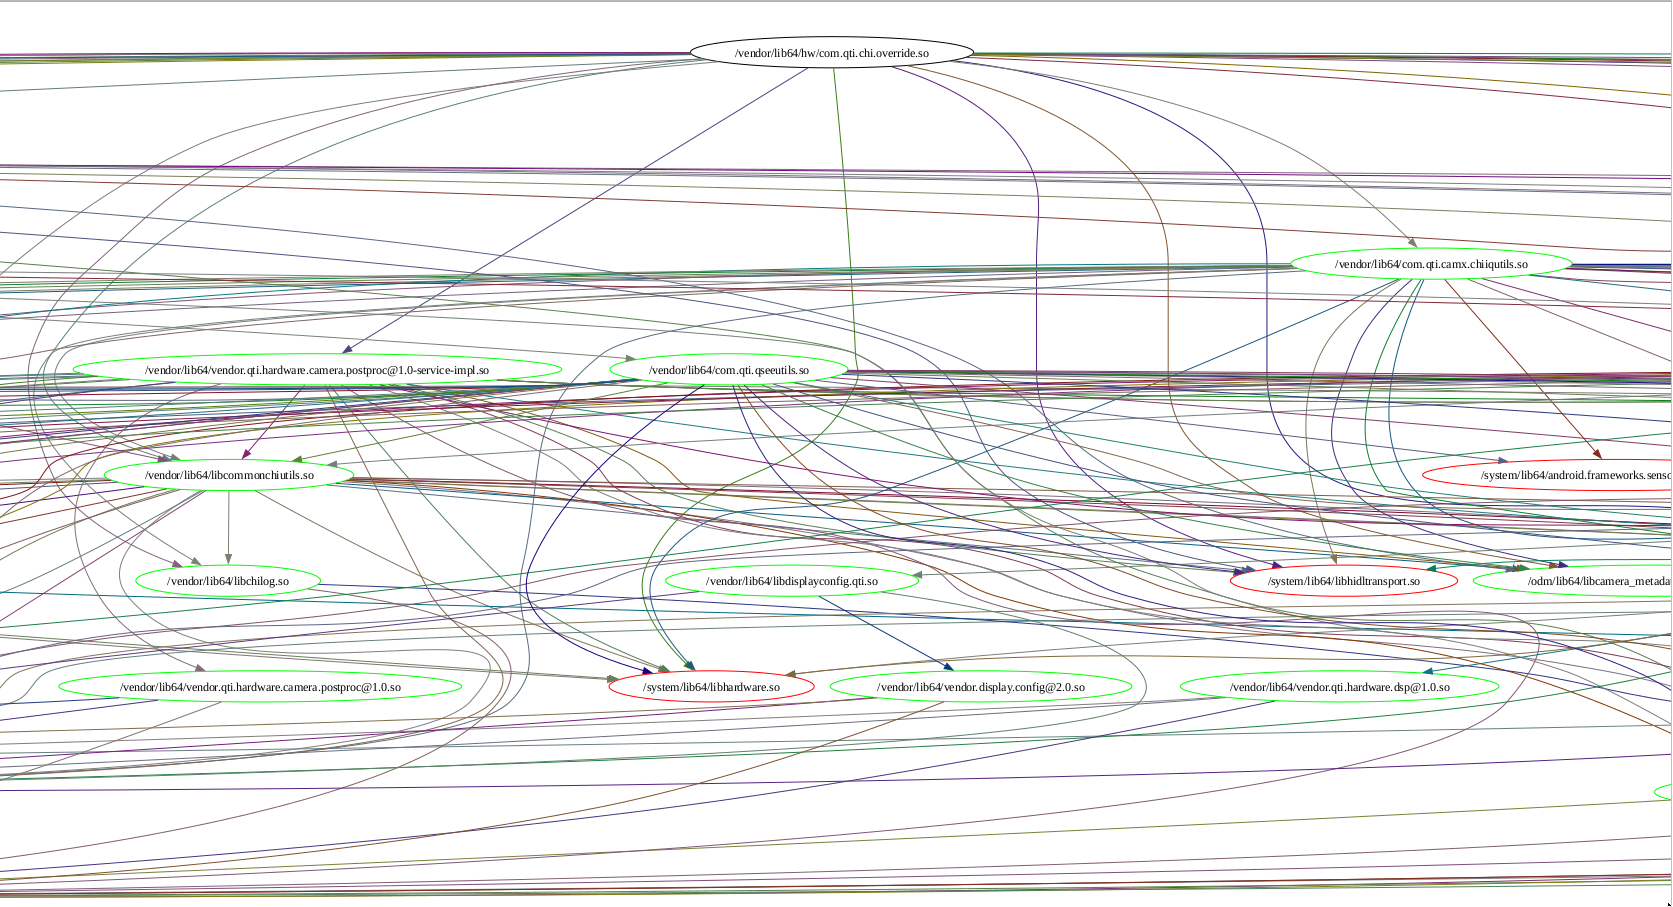
I have written a small script in Scheme to plot those dependencies as a tree:
#!/usr/bin/chibi-scheme -q
(import (chibi shell))
(import (chibi filesystem))
(import (chibi show))
(import (srfi 69))
(import (srfi 113))
(import (only (scheme base) when))
(import (chibi pathname))
(import (only (srfi 1) zip filter))
(import (srfi 27))
(import (srfi 95))
(define to-string
  (lambda (num)
    (substring (show #f (written num)) 0 4)))
(define graph-file "dep-graph.dot")
(define stopfiles (set equal?
                  "/apex/com.android.runtime/lib64/bionic/libdl.so"
                  "/apex/com.android.runtime/lib64/bionic/libc.so"
                  "/apex/com.android.runtime/lib64/bionic/libm.so"
                  "/system/lib64/libc++.so"
                  "/system/lib64/liblog.so"
                  "/system/lib64/libz.so"))
(define processed (set equal?))
(define processed-vertices (set equal?))
(define (get-dep-names file)
  (map (lambda (x) (substring x 1 (- (string-length x) 1)))
   (shell->string-list ("adb" "-s" a740e4ea shell readelf -d ,file) (grep "Shared") (awk "{print $5;}") )))

(define (get-dep-paths filepath)
  (let* ((extractor (lambda (x) ;;:/apex/com.android.i18n/lib64  /vendor/lib64/hw:/vendor/lib64
                      (shell->string-list ("adb" "-s" a740e4ea shell ,(string-append "LD_LIBRARY_PATH='/apex/com.android.i18n/lib64" "'" " ldd  " filepath)) (grep "-v" "vdso") (awk ,(string-append "{print $" x "}")))))
         (deps (extractor "1"))
         (paths (extractor "3")))
    (zip deps paths)))

(define systemp (lambda (target)
             (equal? (substring target 0 (string-length "/system"))
                     "/system")))

(define max-depth 7)

(define walk-tree
  (lambda (path depth)
    (show #t "Processing " path " at depth " depth "\n")
    (set-adjoin! processed path)
    (if (< depth max-depth)
       (let* ((deps (get-dep-names path))
              #;(_ (show #t "deps:" (displayed deps) "\n"))
              (paths (get-dep-paths path))
              #;(_ (show #t "paths:" (displayed paths) "\n"))
              (pairs (filter (lambda (t) (not (equal? #f t)))
                             (map (lambda (dep) (assoc dep paths)) deps)))
              #;(_ (show #t "pairs:" (displayed pairs) "\n"))
              (targets (filter
                        (lambda (t)
                          (not (set-contains? stopfiles t)))
                        (map cadr pairs)))
              #;(_ (show #t "targets:" (displayed targets) "\n"))
              )
         #;(map (lambda (x) (display x) (newline)) pairs)
         (map (lambda (target)
                (let ()
                  (if (not (set-contains? processed-vertices target))
                     (begin
                       (shell (echo ,(string-append "\"" target "\" "
                                                    (if (systemp target)
                                                       "[color=red]"
                                                       "[color=green]"))) (>> ,graph-file))
                       (set-adjoin! processed-vertices target)))
                  (shell (echo ,(string-append "\"" path "\" -> \"" target "\"
                               [color=\""
                               (to-string (random-real))
                               "+"
                               (to-string (random-real))
                               "+"
                               "0.5\"]")) (>> ,graph-file))))
              targets)
         (map (lambda (target)
                (if (and (not (set-contains? processed target))
                      (not (systemp target)))
                   (walk-tree target (+ 1 depth))
                   'already-processed))
              targets))
       (show #t "depth of " depth " reached\n"))))
;; (define my-deps (get-dep-names "/vendor/lib64/libcamerapostproc.so"))
;; (define my-paths (get-dep-paths "/vendor/lib64/libcamerapostproc.so"))
;; (map (lambda (x) (display x) (newline)) my-deps)
;; (map (lambda (x) (display x) (newline)) my-paths)
(define main1
  (lambda ()
    (shell (echo "strict digraph {
ranksep=\"1.2 equally\"" ) (> ,graph-file))
    #;(walk-tree "/vendor/lib64/libcamerapostproc.so" 0)
    #;(walk-tree "/vendor/lib64/vendor.qti.hardware.camera.postproc@1.0-service-impl.so" 0)
    #;(walk-tree "/vendor/bin/hw/vendor.qti.camera.provider-service_64" 0)
    (walk-tree "/vendor/lib64/hw/com.qti.chi.override.so" 0)
    (shell (echo "}" ) (>> ,graph-file))
    ))
(main1)
(shell (dot -Tpdf "dep-graph.dot") (> "dep-graph.pdf"))
(define main2
  (lambda ()
    (let* ((get-rel (lambda (p) (list->set equal? (filter systemp (map cadr (get-dep-paths p))))))
           (deps-camera (set-union (get-rel "/vendor/lib64/libcamerapostproc.so")
                                   (get-rel "/vendor/lib64/vendor.qti.hardware.camera.postproc@1.0-service-impl.so")
                                   (get-rel "/vendor/bin/hw/vendor.qti.camera.provider-service_64")
                                   (get-rel "/vendor/lib64/hw/com.qti.chi.override.so")))
           (deps-libAlgoProcess    (set-union
                                    (get-rel "/odm/lib64/libAlgoProcess.so")
                                    (get-rel "/odm/lib64/libAlgoInterface.so")))
           (difference (set-difference deps-camera deps-libAlgoProcess))
           (shower (lambda (e) (show #t (written e) "\n")))
           (mysort (lambda (s) (sort (set->list s) string<?))))
      (show #t "deps-camera:\n")
      (map shower (mysort deps-camera))
      (show #t "\ndeps-libAlgoProcess:\n")
      (map shower (mysort deps-libAlgoProcess))
      (show #t "\ndifference:\n")
      (map shower (mysort difference)))))
(main2)
Just look at how beautiful it is. It is generating a graphviz tree, and you can compile it into a searchable pdf.
When you find missing dependencies, just add them to proprietary-files.txt.
1.5.5. Java, jadx, smali, and adding polyfills
When simple dependency and log-based methods stop working, it is time to do dig a little bit deeper.
The previous chapter already mentioned decompiling an apk with apktool.
An extremely nice property of apktool compared to traditional decompilers is that it is possible not just to decompile an apk, but to also re-compile it, and the resulting apk will be as good as the old one, except, maybe, losing the platform key, but since we are building our own Lineage, we have the key.
Some adaptations might require you to just adjust the file AndroidManifest.xml and recompile the apk, but sometimes you have to actually edit the code in order to make the app compatible with your platform.
Here comes Smali, the Java assembly.
This is a decent howto on Smali: https://sallam.gitbook.io/sec-88/android-appsec/smali/smali-cheat-sheet See the chapter 1.6.7 to see how actual smali patches work.
apktool will decompile the code successfully, but trawling through megabytes of Smali is tedious, so we have JADX at our disposal.
JADX is a decent decompiler. You can rename variables, add comments, and search nicely.
It is not almighty, and it cannot compile the apps back into apk, so when you find a place you want to modify, you have to edit the original smali code produced by apktool.
Luckily for us, Dalvik does limit the amount of registers per function, so we can add as many as we want, and call Log.e() whenever we need.
const-string v4, "mine-parseMenuSetting"
const-string v5, "17"
invoke-static {v4, v5}, Landroid/util/Log;->e(Ljava/lang/String;Ljava/lang/String;)I
invoke-interface {v0, v2}, Ljava/util/List;->add(Ljava/lang/Object;)Z
As I mentioned, JADX can theoretically connect to a running app and become a debugger, but I failed to make work.
1.5.6. C++, Ghidra, gas, ddisasm, and aarch64
- ELF Format specification :: https://refspecs.linuxfoundation.org/elf/elf.pdf
- Learning Linux Binary Analysis by Ryan “Elfmaster” O’Neill :: https://github.com/PacktPublishing/Learning-Linux-Binary-Analysis
- The Ghidra Book The Definitive Guide by Chris Eagle and Kara Nance :: https://nostarch.com/GhidraBook
- https://blog.k3170makan.com/2018/09/introduction-to-elf-format-elf-header.html
- https://en.wikipedia.org/wiki/Executable_and_Linkable_Format
- https://thinkingeek.com/categories/aarch64/
If Java decompiling does not work, and you need to use heavier artillery, have a look at Ghidra.
- Decompiling
Ghidra features both a disassembler which is stronger than
objdump, and a true de-compiler which can reconstruct way more C than I had expected. Yes, it is still ugly, but nevertheless. Also, Ghidra supports python scripting.Here is my script for starting Ghidra:
source /etc/profile.d/zulu-openjdk21.sh
source pyghidra-venv/bin/activate
 python3 -m pip install 'jpype1==1.5.2' # uses internet
 python3 -m pip install --no-index -f  ./Ghidra/Features/PyGhidra/pypkg/dist pyghidra
 python3 -m pip install --no-index -f  ./Ghidra/Features/PyGhidra/build/pypkg/dist pyghidra
 python3 -m pip install --no-index -f  ./build/typestubs/dist/ ghidra-stubs
./Ghidra/RuntimeScripts/Linux/support/pyghidraRun
The two most important feature that Ghidra decompiler possesses is the ability to rename variables and the ability to identify data structures.
Basically, your main goal is to find enough
structstructures to find out the data tree of a module, and rename the members to understand which parameters are used where.Your best friends are:
malloc/newdeclarations :: they give you the size of the objects,__android_logand similar logging functions :: very often developers are printing their classes/structures, and you can get field names from there,- Exports and Imports :: those are actual parts of the source code remaining in the binaries,
__system_property_get:: often indicates a critical code junction which can be influence by a system property.
- Debugging
- https://stackoverflow.com/questions/78044084/android-app-paused-while-debugging-due-to-sigbus-signal
- https://stackoverflow.com/questions/52377562/how-do-you-create-a-lldb-script-to-ignore-sigsegv-and-sigbus
Sometimes looking at the code for a long time does not actually help without knowing concrete values of the variables.
Here Ghidra debugger comes into play.
As already mentioned, it is possible to attach
lldbto running processes on Android over ADB, but barelldbwould only give you a disassembly and a stack trace, whereas Ghidra can give you a change to see the same code in the decompiled form.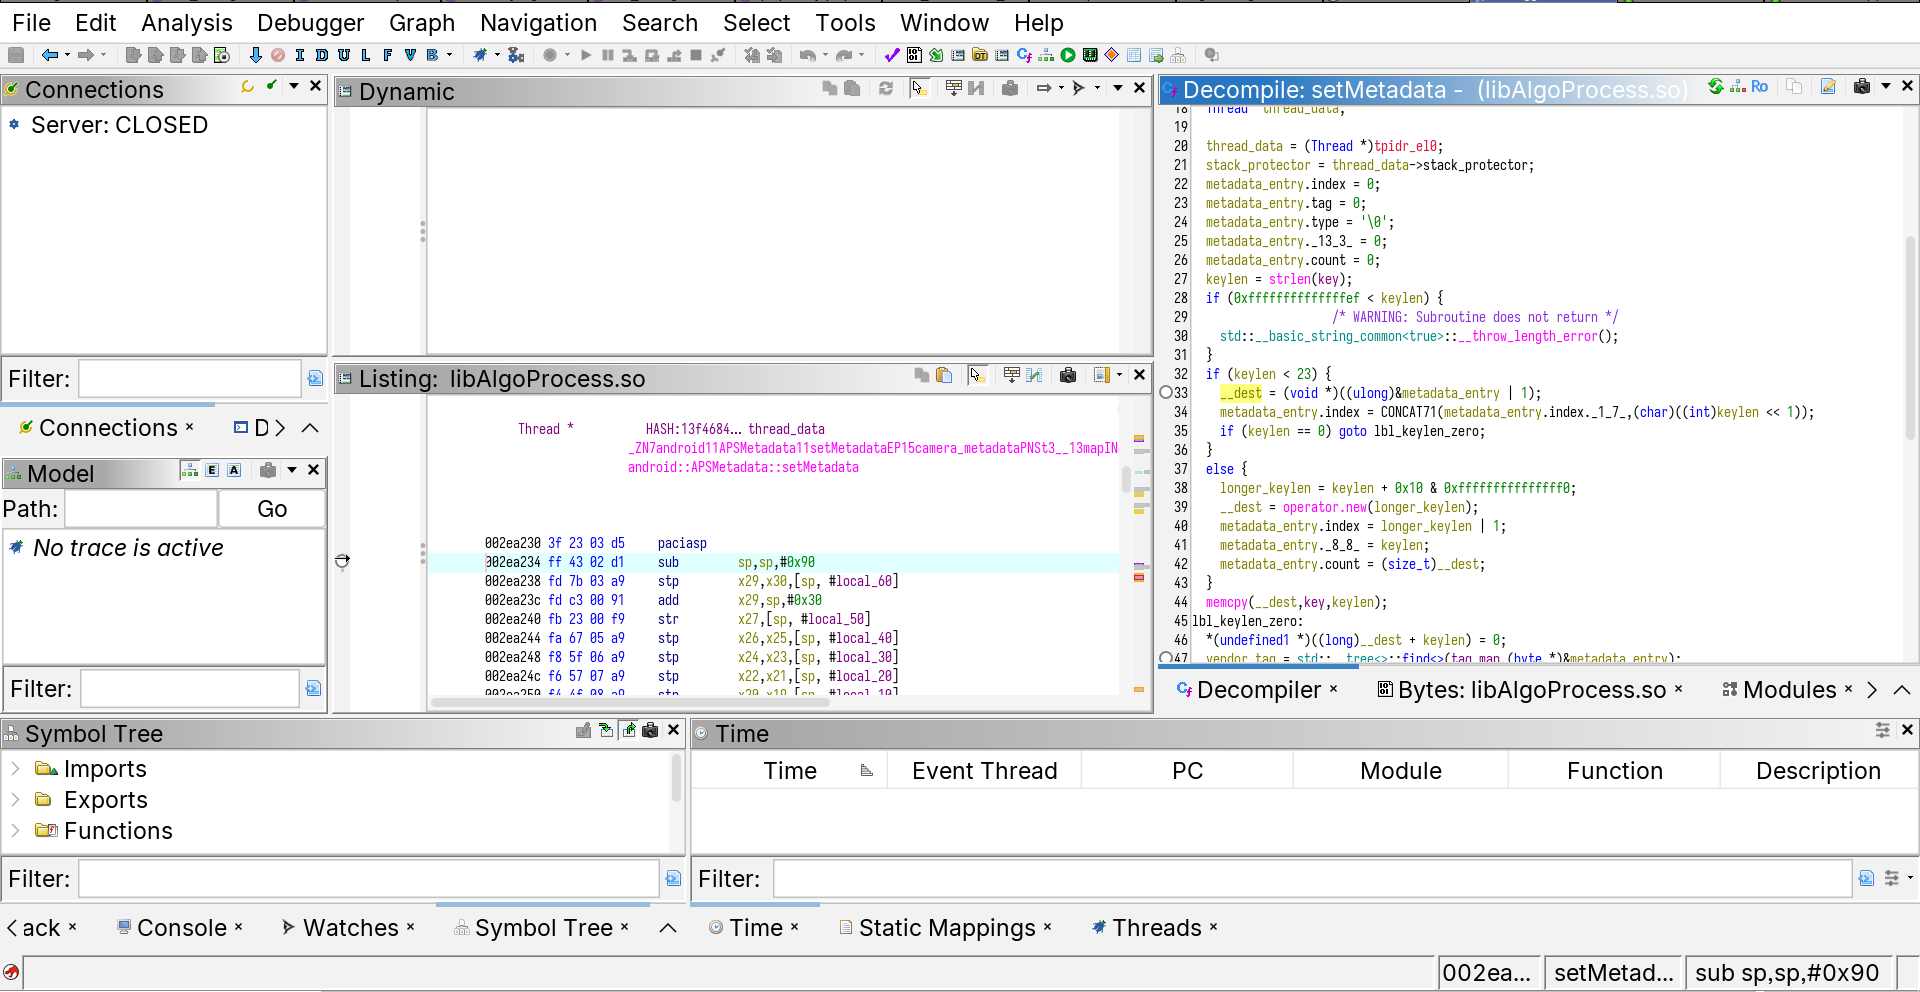
Ghidra Debugger is not as advanced as the Decompiler, but overall it serves its purpose: see the details of the process.
I would say that its main drawback is that it is relatively slow. As for decompiling, it has given me better results than Binary Ninja.
How to connect to an app with Ghidra Debugger
In theory you need to just: (1) start
lldb-serveron the device, (2) just click in the “debug” button and attach to an Android process withlldb. (Keep in mind that is must be Androidlldb, not your system-widelldb.)cat lwf_mylldb.bash R="~/LineageOS-23/" export PYTHONHOME="$R"/prebuilts/clang/host/linux-x86/clang-r530567/python3/ export LD_LIBRARY_PATH="$R"/prebuilts/clang/host/linux-x86/clang-r530567/python3/lib export PYTHONPATH="$R"/prebuilts/clang/host/linux-x86/clang-r547379/lib/python3.11/site-packages/ export PATH="$R/prebuilts/clang/host/linux-x86/clang-r547379/python3/bin/:$PATH" python3 -m pip install --force-reinstall --no-deps --no-index -f ~/OfficialRepos/ghidra/Ghidra/Debug/Debugger-rmi-trace/build/pypkg/dist/ -f ~/OfficialRepos/ghidra/Ghidra/Debug/Debugger-agent-lldb/build/pypkg/dist ghidralldb exec "$R"prebuilts/clang/host/linux-x86/clang-r547379/bin/lldb "$@"
But this is a bit inconvenient, because you would have to change a PID each time an app crashes, which is annoying.
So I just tweaked the file
lldbsetuputils.shfrom Ghidra:diff --git a/Ghidra/Debug/Debugger-agent-lldb/data/support/lldbsetuputils.sh b/Ghidra/Debug/Debugger-agent-lldb/data/support/lldbsetuputils.sh index 0211b02639..39200c1e7e 100644 --- a/Ghidra/Debug/Debugger-agent-lldb/data/support/lldbsetuputils.sh +++ b/Ghidra/Debug/Debugger-agent-lldb/data/support/lldbsetuputils.sh @@ -131,15 +131,32 @@ compute-lldb-platform-args-attach() { shift shift shift + #target_pid=$(adb -s a740e4ea shell 'pgrep -f om.oplus.camera') + addrDiff="00118484-001173e0" + addrDiff=${addrDiff^^} + addrDiff=$(echo "obase=16;ibase=16; $addrDiff" | bc -l) + addrDiff=${addrDiff,,} args+=("$OPT_LLDB_PATH") add-lldb-init-args args+=(-o "platform select '$target_type'") + args+=(-o "platform connect '$target_url'" -o 'settings set plugin.jit-loader.gdb.enable off') add-lldb-pid "$target_pid" add-lldb-connect-and-sync "$rmi_address" add-lldb-extra-cmds add-lldb-tail-args + args+=(-o "process handle --pass true --stop false --notify false SIGSEGV" -o "process handle --pass true --stop false --notify false SIGBUS" -o "settings set plugin.jit-loader.gdb.enable off" -o 'settings set plugin.jit-loader.gdb.enable off' -o 'br set -a `(void(*)())_ZN8OemLayer17configure_streamsEPK14camera3_deviceP28camera3_stream_configuration+0x'$addrDiff'`' -o 'process handle --pass true --stop true --notify true SIGCHLD' -o 'settings set plugin.jit-loader.gdb.enable off' -o 'process status') # -o detach -o "attach $target_pid" } compute-lldb-remote-args() {This way you can get all the information about the process automatically, and also set a break point right in the file. I really recommend trying to understand how the breakpoint is set at an address relative to a function. This is important because due to ASLR (address space layout randomization), libraries are loaded at different addresses each time.
Also important
The files you are debugging in Ghidra must have the same “project names” as are their file names, otherwise Ghidra will fail to find a correspondence between the memory and the file.
- Patching the binary
When you know how to fix the binary, you need to write some assembly code.
You can try practising assembly programming with GNU GAS (GNU Assembler), which is shipped together with Lineage.
Here is an example: #+name GAS-Hello-World
	.arch armv8-a
	.text
	.globl _start
_start:

	mov     x0, 1           /* file descriptor: 1 is stdout */
	adr     x1, msg         /* message location (memory address) */
	mov     x2, len         /* message length (bytes) */

	mov     x8, 64          /* write is syscall #64 */
	svc     0               /* invoke syscall */

	mov     x0, 0           /* status -> 0 */
	mov     x8, 93          /* exit is syscall #93 */
	svc     0               /* invoke syscall */

	.data
msg:    .ascii      "Hello, world!\n"
	len=    . - msg
Here is an example of a loop:
	.text
	.globl _start
	min = 0                          /* starting value for the loop index; **note that this is a symbol (constant)**, not a variable */
	max = 10                         /* loop exits when the index hits this number (loop condition is i<max) */
_start:
	mov     x19, min       /* the value in register 19 = loop index */
loop:
	/* ... body of the loop ... do something useful here ... */
	mov     x0, 1           /* file descriptor: 1 is stdout */
	adr     x1, msg         /* message location (memory address) */
	mov     x2, len         /* message length (bytes) */

	mov     x8, 64          /* write is syscall #64 */
	svc     0               /* invoke syscall */
	/* .. useful things done */
	add     x19, x19, 1     /* increment the loop counter */
	cmp     x19, max        /* see if we've hit the max */
	b.ne    loop            /* if not, then continue the loop */
	mov     x0, 0           /* set exit status to 0 */
	mov     x8, 93          /* exit is syscall #93 */
	svc     0               /* invoke syscall */
	.byte   0xFE
	.section .data
msg:    .ascii      "Hello, world!\n"
mylabel: len=    . - msg
	.byte   0xFF
To defeat race conditions, sometimes it is enough to just wait:
	.arch armv8-a
	.text
	.globl _start
_start:
	b call_nanosleep
arg1:
	.byte 10
	.rept 15
	.byte 0
	.endr
call_nanosleep:
	adr x0, arg1
	mov x1, 0
	mov     x8, 101         /* write is syscall #64 */
	svc     0               /* invoke syscall */
prg_exit:
	mov     x0, 0           /* status -> 0 */
	mov     x8, 93          /* exit is syscall #93 */
	svc     0               /* invoke scallop */
Generally, you only need to learn a few primitives, as it is unlikely that you’d have to write a lot of complicated stuff in assembly.
b(and otherb-like instructions) :: jump to an addressmov:: sets a registerstr(and others-like instructions) :: put data in memoryldr(and otherl-like instructions) :: read data from memorycbz(and otherc-like instructions) :: jump somewhere if a register is 0
See https://mariokartwii.com/armv8/ for a much better tutorial.
Often you just have to jump over a particular crashing function call.
- Smali-like programming for GAS
Everything described above is nice and well, if you can find a place in the binary to write your code. You see, assembly code is very file-offset dependent, and if you “insert” some data into a file, all of those offsets will become de-synchronised and your binary will be a complete failure.
This is not much of an issue if you can “erase” some useless code (such as calls to logging functions) and place useful code there. But what if not?
Welcome
ddisasm: the bidirectional disassembler-assembler.It is an amazing tool https://github.com/grammatech/ddisasm , totally underappreciated. It essentially allows a smali-like disassemble-modify-assemble rapid iteration development.
Yes, you still have to write in assembly, but you now can insert your assembly anywhere in the code, just remember to save register values onto the stack (or allocate some memory for them) before your code runs, and restore them after, because, unlike smali, registers are not infinite.
1.5.7. Frida
- https://www.youtube.com/watch?v=RoNppaG1re4
- https://github.com/iddoeldor/frida-snippets?tab=readme-ov-file
- https://cilynx.com/vulnerabilities/exploring-native-functions-on-android-and-runtime-analyses-using-jadx-ghidra-and-frida/1565/
- https://github.com/Hamz-a/frida-android-libbinder
Ghidra is programmable in Java and Python, in theory you can run Ghidra scripts in Ghidra debugger, but it is a bit inconvenient, because Ghidra works by pulling memory to your machine via lldb, which sometimes happens to be slow.
Frida goes into the opposite direction. It embeds a JavaScript interpreter into the target process and allows you to run arbitrary JS code at trace points. You can use this, for example, to trace important functions calls.
Frida is instantaneously fast.
I did not use Frida a lot (just traced a few function calls), but generally a programmable debugger-tracer is a very mighty tool.
For example, you can monitor Binder transactions. https://github.com/iddoeldor/frida-snippets?tab=readme-ov-file#binder-transactions
1.5.8. TODO Adding sections to binary files, add-linking C functions and GNU Poke
This section is not developed, because I did not do it.
So, the idea is that one might want to write a C function, compile it into an .o file and all-link it to an .so binary.
The goal is to be able to call that function from within some other functions, for example inserting a call with ddisasm.
I suspect that GNU Poke-ELF (https://www.jemarch.net/poke-elf.html) should be able to do that, but I am not sure.
1.6. OnePlus particulars
The name of this chapter is a bit misleading. Not everything mentioned here is OnePlus, BBK, Qualcomm or even camera specific. But this chapter is the only one where I am trying to dump the rest of the collected knowledge which is not unequivocally “Android-generic”.
1.6.1. Feature summary
- Working features
- Normal photos
- 50 MPx photos
- “Livephoto”
- 1080@60Hz video
- 4k@30Hz video
- “Pro” photos
- Panorama
- SELinux
- Partially working features
- 4k@60Hz video
- slomo videos
- RAW images
- RAW+ images
- Broken features
- Portrait/Bokeh
- AI ID scanning
- 10bit+HEIC images
1.6.2. Previous work
I started, of course, standing on the shoulders of giants, which in my case are
- https://gitlab.com/pjgowtham/proprietary_vendor_oplus_camera
- https://gitlab.com/ThankYouMario/proprietary_vendor_oplus_camera
I did not really care whether I am getting an “OnePlus Camera” (the international build), or the “OPlus Camera” (the Chinese build), as I only needed the offline features, and the Chinese version turned out to be easier to port.
A few points deserve attention.
- Binary extraction
- Init script
- Mounting the files to override selinux context
- Main Camera project name
Extracting blobs is documented here: https://wiki.lineageos.org/extracting_blobs_from_zips_manually
The important thing is that at some point LineageOS has moved from extract-blobs.sh to extract-blobs.py, which seems to be more functional, but is a little weird to use.
I was extracting blobs from an unpacking of the most recent version of the OnePlus original operating system, done as usually done with most Lineage builds, with a single caveat.
My system used a single “APEX” package to provide alternative versions of the binary libraries to (at least some of) camera .so libraries as dependencies.
So in addition to unpacking the first layer of firmware into separate directories (system, system_ext, vendor, odm), I had to unpack that APEX file and add an additional directory to the unpack.
It is very important that some binaries are “pinned”, that is that they are not expected to be extracted and are provided with the camera module itself. In my project those are the files of the camera and gallery themselves, because they are actually re-compiled from Smali sources.
Init script, mount, and camera project name come from my predecessors, and I did not try removing them, and I do not know if they still serve any purpose.
1.6.3. Initial debugging with rg, readelf, logcat and dependency drawing.
It is surprising how far one can go without any specific debugging tools, just by reading logs and following the intuition.
Essentially I kept reading adb -s <devid> logcat and adb -s <devid> dmesg for errors, and tried fixing those which were appearing.
Most of the problems were of these kinds:
- Missing Java classes :: those I implemented in the
oplus-fwk - Missing start-time
.solibraries :: those I copied from the original firmware. - Missing
dlopen.solibraries :: those were also usually reported in the log, except when they were not.
At some point I used a script written by myself in Scheme in order to plot the dependency tree of the camera .so files.
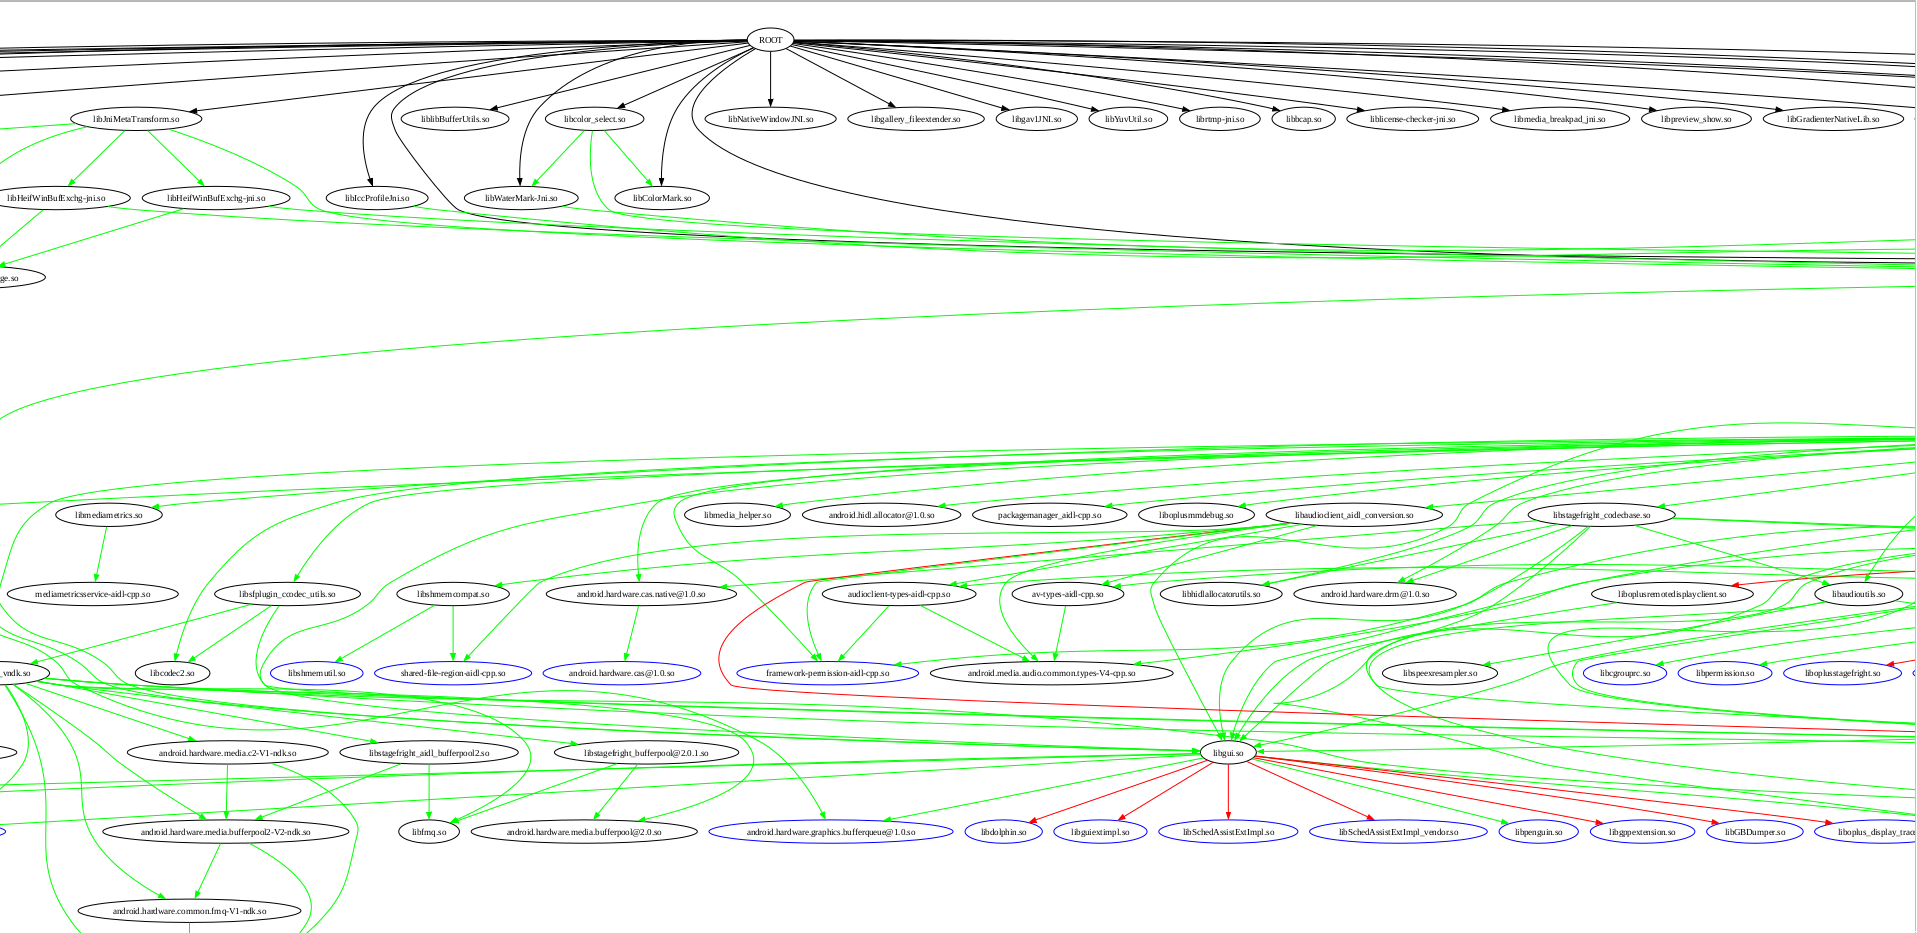
This is just a fragment, the full graph is a PDF, and it kinda helped me to track which dependencies are already installed and which are not related to the camera.
1.6.4. Rebuilding the camera apk.
At some point I found that the requirements for the apk files changed with between Android 13, 14, 15 and 16.
Those changes, luckily, were primarily those which can be accommodated with one of the two methods:
- Adding some statements into the
AndroidManifest.xmlto declare using new permissions. - Adding some statements to the
/system_ext/etc/permissions/*xmland/system/etc/sysconfig/*xml/system_ext/etc/default-permissions/*xmlto grant those permissions to the app without asking. See the files in the camera project repo.
But if changing the xml files in on the system is easy, changing the xml file in the apk requires recompiling the apk.
Here is my script for it:
cd ~/Lineage-Camera
(
  set -x
  cd OplusCamera-15 && \
  rm -rf ./dist/OplusCamera-15.apk  && \
  apktool b && \
  java -jar ~/Lineage-Build/out/host/linux-x86/framework/apksigner.jar sign --in ./dist/OplusCamera-15.apk -out ./dist/OplusCamera-15.apk.signed --cert ~/Lineage-Build/build/make/target/product/security/platform.x509.pem --key ~/Lineage-Build/build/make/target/product/security/platform.pk8 --v3-signing-enabled false && \
  mv ./dist/OplusCamera-15.apk.signed ./dist/OplusCamera-15.apk && \
  mysha=$(sha1sum ./dist/OplusCamera-15.apk | cut -d ' ' -f 1) &&
  printf 'Opluscam sha1sum=%s\n' "$mysha" &&
  sed -i "/my_product\/app\/OplusCamera\/OplusCamera\.apk/s/|.*$/|$mysha/"   ~/Lineage-Build/vendor/oplus/camera/proprietary-files.txt &&
  cp ./dist/OplusCamera-15.apk ~/Lineage-Build/vendor/oplus/camera/proprietary/system_ext/priv-app/OplusCamera/OplusCamera.apk || exit 1
) && \
(
  cd OppoGallery2 && \
  rm -rf ./dist/OppoGallery2.apk && \
  apktool b && \
  jarsigner -storepass "android" -verbose -sigalg SHA1withRSA -digestalg SHA1 -keystore ~/.android/debug.keystore ./dist/OppoGallery2.apk androiddebugkey && \
  mysha=$(sha1sum ./dist/OppoGallery2.apk | cut -d ' ' -f 1) &&
  printf 'Oplusgallery sha1sum=%s\n' "$mysha" &&
  sed -i "/my_stock\/priv-app\/OppoGallery2\/OppoGallery2\.apk/s/|.*$/|$mysha/"   ~/Lineage-Build/vendor/oplus/camera/proprietary-files.txt &&
  cp ./dist/OppoGallery2.apk ~/Lineage-Build/vendor/oplus/camera/proprietary/system_ext/priv-app/OppoGallery2/OppoGallery2.apk
) || exit 2

if ! diff -u OplusCamera-15/dist/OplusCamera-15.apk ~/Lineage-Build/vendor/oplus/camera/proprietary/system_ext/priv-app/OplusCamera/OplusCamera.apk  ; then
  printf 'Cameras do not match!\n'
  exit 1
fi

if ! diff -u OppoGallery2/dist/OppoGallery2.apk ~/Lineage-Build/vendor/oplus/camera/proprietary/system_ext/priv-app/OppoGallery2/OppoGallery2.apk ; then
  printf 'Galleries do not match!\n'
  exit 1
fi
Note that I am actually signing the camera apk with the platform key.
This is superfluous when building Android once, but if you want to avoid re-flashing the image each time you rebuild the apk, you can sign the apk with the “platform key” and just copy it to the target directory.
1.6.5. camxoverridesettings.txt
There was a third, “bonus” file to edit, /etc/camera/camxoverridesettings.txt, but it only required two edits.
raiserecoverysigabrt=0
disableFDHWProcessing=1
The first one does not crash the process when ASAN (https://clang.llvm.org/docs/AddressSanitizer.html) failures occur, and they will occur because, come on, the project is not built from one source.
The second disables hardware face detection (FD is Face Detection), because there were some crashes connected to it? (I guess, I actually forgot).
See the link to xda-forums for more details about using camxoverridesettings.txt.
In particular, by setting enableFeature2Dump=1 it is possible to get not just DNG RAW, but full-sized Bayer matrix dumps into /data/vendor/camera.
The full list of parameters is in the project repo, but I don’t know what they mean.
1.6.6. oplus-fwk.jar
I had to stub a lot of oplus-framework.jar functions, mostly blindly making them return false, null, throw an exception, or do nothing.
Perhaps this is the part of my work most likely to be accepted to LineageOS’ upstream.
Not all of the code is written by me, a lot of it is written by my predecessor, sx75 from crdroid.
In total, this is:
git log HEAD~2..HEAD --patch -- oplus-fwk/ | wc -l
16099
in
git log HEAD~2..HEAD --stat -- oplus-fwk | grep -F '|'  | wc -l
135
I had to add the following exceptions to the declared “allowed framework classes” into build/soong/scripts/check_boot_jars/package_allowed_list.txt
diff --git a/scripts/check_boot_jars/package_allowed_list.txt b/scripts/check_boot_jars/package_allowed_list.txt
index 983650039..7c5ed0ca2 100644
--- a/scripts/check_boot_jars/package_allowed_list.txt
+++ b/scripts/check_boot_jars/package_allowed_list.txt
@@ -280,6 +280,12 @@ com\.nvidia\..*
 # OPLUS adds
 com\.oplus\..*
+oplus\..*
+com.coloros\..*
+vendor.oplus\..*
+com.heytap\..*
+net.oneplus\..*
+com.color\..*
 # QC adds
 com.qualcomm.qti
1.6.7. Solving a race condition with Smali
Even though I have introduced Smali in 1.5.5, I actually did not need to write much Smali to solve concrete issues. Essentially, I added just two patches: one fixed a race condition deadlock, another one removed a hanging check.
The deadlock is fixed like this, and I am afraid to touch it, because it is just making the correct thread “win” the race and is not actually solving the bug.
diff --git a/smali/com/oplus/camera/common/config/CameraSettingsConfig.smali b/smali/com/oplus/camera/common/config/CameraSettingsConfig.smali
index e80eaccf..befe96b8 100644
--- a/smali/com/oplus/camera/common/config/CameraSettingsConfig.smali
+++ b/smali/com/oplus/camera/common/config/CameraSettingsConfig.smali
@@ -1383,7 +1383,7 @@
 .end method
 .method public static declared-synchronized initialize(Landroid/content/Context;)V
-    .locals 3
+    .locals 6
     .line 1
     const-class p0, Lcom/oplus/camera/common/config/CameraSettingsConfig;
@@ -1472,6 +1472,9 @@
     .line 45
     sput-boolean v0, Lcom/oplus/camera/common/config/CameraSettingsConfig;->sbInit:Z
+    const-string v4, "mine-initialize"
+    const-string v5, "after sbInit=true;"
+    invoke-static {v4, v5}, Landroid/util/Log;->e(Ljava/lang/String;Ljava/lang/String;)I
     .line 46
     .line 47
@@ -1487,23 +1490,23 @@
     .line 50
     :cond_0
     :goto_0
-    const-string v0, "CameraSettingsConfig"
+#    const-string v0, "CameraSettingsConfig"
     .line 51
     .line 52
-    new-instance v1, Lcom/oplus/camera/common/config/a;
+#    new-instance v1, Lcom/oplus/camera/common/config/a;
     .line 53
     .line 54
-    const/4 v2, 0x0
+#    const/4 v2, 0x0
     .line 55
-    invoke-direct {v1, v2}, Lcom/oplus/camera/common/config/a;-><init>(I)V
+#    invoke-direct {v1, v2}, Lcom/oplus/camera/common/config/a;-><init>(I)V
     .line 56
     .line 57
     .line 58
-    invoke-static {v0, v1}, Ll7/a;->r(Ljava/lang/String;Ljava/util/function/Supplier;)V
+#    invoke-static {v0, v1}, Ll7/a;->r(Ljava/lang/String;Ljava/util/function/Supplier;)V
     :try_end_0
     .catchall {:try_start_0 .. :try_end_0} :catchall_0
@@ -1513,6 +1516,9 @@
     monitor-exit p0
     .line 62
+    const-string v4, "mine-initialize"
+    const-string v5, "after before return-void;"
+    invoke-static {v4, v5}, Landroid/util/Log;->e(Ljava/lang/String;Ljava/lang/String;)I
     return-void
     .line 63
The second is just as simple:
--- a/smali/com/oplus/camera/common/config/CameraSettingsConfig.smali
+++ b/smali/com/oplus/camera/common/config/CameraSettingsConfig.smali
@@ -3683,32 +3683,37 @@
     .line 157
     .line 158
     .line 159
-    invoke-static {}, Lv6/k2;->c()Z
+#    invoke-static {}, Lv6/k2;->c()Z
     .line 160
     .line 161
     .line 162
-    move-result v0
+#    move-result v0
     .line 163
-    if-eqz v0, :cond_5
+#    if-eqz v0, :cond_5
     .line 164
     .line 165
-    iget-object v0, p0, Lcom/oplus/camera/common/config/CameraSettingsConfig;->mMenuSettingList:Ljava/util/List;
+#    iget-object v0, p0, Lcom/oplus/camera/common/config/CameraSettingsConfig;->mMenuSettingList:Ljava/util/List;
     .line 166
     .line 167
-    const-string v2, "pref_spruce_function_key"
+#    const-string v2, "pref_spruce_function_key"
     .line 168
     .line 169
-    invoke-interface {v0, v2}, Ljava/util/List;->add(Ljava/lang/Object;)Z
     .line 170
     .line 171
     .line 172
-    :cond_5
+#    :cond_5
     invoke-static {}, Lcom/oplus/camera/configure/CameraConfig;->C()Z
     .line 173
That is just it. I just removed some hanging function calls.
1.6.8. slomo workaround
This issues is not entirely solved, but at least is somehow progressed. When I was trying to find out why the “240Hz slomo” mode is not opening in the camera, I encountered a message about not enough buffers being allocated for a stream.
This is related to an Android feature called “HAL3 buffer management API.” (https://source.android.com/docs/core/camera/buffer-management-api)
requestStreamBuffers is a function which is sometimes called by the “Camera HAL” client to receive … something.
I guess, some buffer pointers, for stream data.
The log was complaining about the code requiring too many buffers, more than had been allocated in advance.
I added a hack to allocate more buffers, but the issue is probably that BBK ships a patched version of their cameraserver and its dependencies, which somehow manage buffers differently.
It was also complaining about wrong frame numbers… whatever that is.
diff --git a/services/camera/libcameraservice/device3/Camera3OutputUtils.cpp b/services/camera/libcameraservice/device3/Camera3OutputUtils.cpp
index 7a53847765..ddcf59c096 100644
--- a/services/camera/libcameraservice/device3/Camera3OutputUtils.cpp
+++ b/services/camera/libcameraservice/device3/Camera3OutputUtils.cpp
@@ -654,10 +654,15 @@ void processCaptureResult(CaptureOutputStates& states, const camera_capture_resu
	 std::lock_guard<std::mutex> l(states.inflightLock);
	 ssize_t idx = states.inflightMap.indexOfKey(frameNumber);
	 if (idx == NAME_NOT_FOUND) {
-            SET_ERR("Unknown frame number for capture result: %d",
-                    frameNumber);
+          if (states.inflightMap.size() != 0) {
+            idx = states.inflightMap.size() - 1;
+            goto mine_out;
+          }
+          SET_ERR("Unknown frame number for capture result: %d",
+                  frameNumber);
	     return;
	 }
+    mine_out:
	 InFlightRequest &request = states.inflightMap.editValueAt(idx);
	 ALOGVV("%s: got InFlightRequest requestId = %" PRId32
		 ", frameNumber = %" PRId64 ", burstId = %" PRId32
diff --git a/services/camera/libcameraservice/device3/Camera3Stream.cpp b/services/camera/libcameraservice/device3/Camera3Stream.cpp
index ae76e603bd..0a0360e306 100644
--- a/services/camera/libcameraservice/device3/Camera3Stream.cpp
+++ b/services/camera/libcameraservice/device3/Camera3Stream.cpp
@@ -382,7 +382,9 @@ status_t Camera3Stream::finishConfiguration(/*out*/bool* streamReconfigured) {
	 std::string name = std::string("Stream ") + std::to_string(mId);
	 mStatusId = statusTracker->addComponent(name);
     }
-
+    if (camera_stream::max_buffers >=6 || camera_stream::max_buffers <= 24 ) {
+      camera_stream::max_buffers = 25;
+    }
     // Check if the stream configuration is unchanged, and skip reallocation if
     // so.
     if (mState == STATE_IN_RECONFIG &&
I suspect it should increase memory usage significantly.
Somehow this made the “slomo” work, even though in some kind of crippled way. It is “slow” (whatever that means for a slo-mo), and crashes in the dark. I guess this issues is still awaiting its champion.
Is suspect it is somehow related to “stream metadata”, the same issue as in 1.6.11.
1.6.9. Decompiling and finding the logging parameters.
When the app began starting successfully, I discovered that it crashes in the native code when making photos.
Native code means that disassembling and binary debugging now became mandatory.
The first steps in debugging the camera were a detour, but I still found some useful stuff.
That is, I found some system properties which enable debugging logging for the Oplus Camera, and some for the Qualcomm backend:
ro.control_privapp_permissions=log \
persist.sys.state.is.otest.running=1 \
vendor.oplus.apsSN.algo.enable=0 \
ro.control_privapp_permissions=log \
sys.gcsupression.optimize.enable=0 \
persist.camera.aps.core.warningMask=0xffffffffffffffffffffffffffffffff \
persist.camera.aps.core.infoMask=0xffffffffffffffffffffffffffffffff \
persist.camera.aps.core.debugMask=0xffffffffffffffffffffffffffffffff \
oplus.autotest.camera.debug.forcelog=true \
persist.sys.camera.lao.enable=true \
persist.oplus.aps.trace=true \
com.oplus.camera.pw.debug.capture.flow=true \
ro.build.release_type=false \
ro.build.version.ota=PRE \
ro.version.confidential=false \
persist.camera.rotate.dump=true \
persist.camera.cfr.debug=1 \
vendor.aps.logic.snapshot.metadata.debug=1\
persist.sys.assert.panic=true  \
persist.camera.assert.panic=true \
persist.vendor.camera.oplus.enableLogging=true \
persist.sys.dump.aps=1 \
persist.vendor.camera.jpeghwencode=1
Not all of them enable debugging, but the names are quite self-explanatory.
The “dumps” usually go to /data/vendor/camera/, the logs go to logcat.
There are some logging parameters in camxoverridesettings.txt, but I failed at using them, too difficult.
As I said, some parameters are actually misleading and led to a detour.
In particular, persist.vendor.camera.jpeghwencode=1 does make the post-processing flow go into a different direction, but it turned out to be harder to debug than the “hardware” one.
At the end of the day, the camera supports hardware post-processing. (The name of the parameter is misleading, it is not just activating hardware JPEG.)
1.6.10. AHardware_GetNativeBuffer
One of the crashes that I had to debug for the camera to work was a crash related to a wrong version of AHardwareBuffer_lock
(https://developer.android.com/ndk/reference/group/a-hardware-buffer#group___a_hardware_buffer_1gaf10c050f1ddfe2a074ab0f80660b2925)
I found that a piece of code was crashing the program by accessing a non-allocated memory, as so-called “segmentation failure”.
Of course, I had had many segmentation faults before, but never studied in depth where they may be coming from. It turns out that program memory space is fixed for a program when it is loaded into memory and how in-process addressing works in modern operating systems.
To keep the long story short, the code was crashing in an completely innocuous function, which was just manipulating some bits, i.e. no complicated system calls, stack unwinding, or any other magic.
I started investigating why it crashes at accessing some memory, and found out that neither my debugger (lldb), nor Ghidra debugger can access that memory and it is shown as “unmapped”. (Note that in Linux, “unmapped” my mean both “not mapped to a different process”, and “not allocated even in the current process space”.)
Neither the Ghidra Book, nor “Learning Linux Binary Analysis” helped me with solving this mystery, but at some point I encountered a StackOverflow question asked by a programmer who could not read memory-mapped region with his debugger, and I guessed that this might be my case.
To this day I do not know whether this memory is from Android Binder or from just a simple mmap, but it did not matter for my case.
I started to look around that code, and found that the mapped memory region was produced by a call to a function in the “AHardwareBuffer” family.
I looked at the code for extracting binaries from the vendor’s firmware, and found the following lines (https://github.com/xigua-dev/device_oneplus_xigua/blob/183e8f24df43b390f8e26a8d7c6f40bcc99f65e5/extract-files.py#L55):
('odm/lib64/libHIS.so', 'odm/lib64/libOGLManager.so'): blob_fixup()
      .clear_symbol_version('AHardwareBuffer_allocate')
      .clear_symbol_version('AHardwareBuffer_describe')
      .clear_symbol_version('AHardwareBuffer_lock')
      .clear_symbol_version('AHardwareBuffer_release')
      .clear_symbol_version('AHardwareBuffer_unlock'),
“What the hell?” – I thought. “These are the same functions which are used near the place where my code crashes. Why are symbols there even versioned?”
Also, symbol versions for those functions were weird.
They were not what we usually have in Linux, as in @GLIBC_2.24, but just @LIBNATIVEWINDOW.
It is worth noting that in Linux linking, symbols with symbol versions can be linked with libraries requiring functions without symbol versions, but not the other way round. I.e. if you library requires some symbols, versioned will do, but if it requires versioned, un-versioned will not work.
Then I added the copy of libnativewindow.so to the list of extracted binaries from the vendor’s firmware, and also a set of its dependencies transitively, and had to rewrite some “sonames” and replace dependencies, and boom, the camera started to start up successfully and not crash when trying to make photos.
The photos still did not appear in the DCIM directory, but at least the camera did not crash.
I assume that the different versions of the AHardwareBuffer_* functions are creating different mappings of the P010 raw pixels arrays in the memory, and the code in the camera was expecting some particular mapping.
1.6.11. Metadata in the vendor camera hal provider
After I made the camera successfully try to make photos, I found that they do not appear in the DCIM directory.
Luckily, at the same time some crashdumps, “tombstones” started to appear in the /data/tombstones/ directory.
Those crashdumps indicated that the crash was happening in the process called vendor.qti.camera.provider-service_64.
This seems to be a process written by Qualcomm, which is responsible for managing the camera devices in the Linux kernel (/dev/video*) and wrapping their usage into the Android HAL API.
I am still not exactly sure whether the camera app is interacting with the HAL process through the Binder calls directly, or through a different process running under the same cameraserver user, inventively called cameraserver.
In any case, the crash was happening because the function called PostProc was querying the “stream metadata” for the Logical Camera ID and the Physical Camera ID, and since both were missing, it was using some inappropriate heuristic to get the physical ID, and was accessing unmapped memory.
I started to investigate why exactly they were missing, but failed and never found the cause.
However, grepping and searching for various relevant symbols create a strong impression in me that BBK has somehow noticeably patched the process called cameraserver, and the library called libcsextimpl.so, so that they would be writing more metadata into the streams, which the Qualcomm process, in turn, would be relying upon.
As far as I understand, this is not a polite way of writing code. The code of the “framework” should be unchanged, and only “ODM” code should be tweaked by the phone manufacturer, but hey, who am I to say what should and what should not be done outside of my area of expertise.
Initially I tried to do the same thing with libcsextimpl.so, but found that in the current Android version Google has turned it into a static library instead of a dynamic one, and even though making it dynamic again and trying to replace the open source version with a binary one, but it turned out to require way more dependency rewriting than I had expected, and I gave up.
However, it turned out that by using a small binary patch I can set that “Logical Camera ID” to always be zero, and it was enough to placate the PostProcess function to do its function correctly.
I generated the patched binary in Ghidra (by using the “Patch instruction” feature), and then used diff -u and xxd to generate a two-line binary diff, which I added to the extract-files.py, and voila, it works.
.binary_regex_replace( # metadata error in in ChiOfflineIPEUpscale::PostProcess(PostProcSessionParams*)
    bytes.fromhex('6299009400060035844F40F962034039940040B982051836460100B0C6F444F9'),
    bytes.fromhex('0000805200060035844F40F9620340391400805282051836460100B0C6F444F9'))
1.6.12. What actually is “stream metadata”?
- https://source.android.com/docs/core/camera/camerax-vendor-extensions
- https://source.android.com/docs/core/camera/camera3
So, in addition to capturing CCD pixel intensity, the camera also measures a lot of parameters, such as aperture, shutter delay, flash, timestamp of each frame, et cetera.
Those are saved into a data structure called “stream metadata”, which is basically a map/dictionary from “vendor tags” to metadata values.
That is, metadata keys are binary numbers, not text strings, and each participant in this trio: Google, Qualcomm, BBK, is having its own system for converting strings such as "com.oplus.LogicalCameraID" into a code for querying metadata.
There is an issue about it https://issuetracker.google.com/issues/261760717
I suspect that in the current setup a lot of metadata is not getting into the pipeline.
Tags can be dumped using the property vendor.aps.logic.snapshot.metadata.debug=1, I think.
The file called /data/vendor/camera/metadata/metadatatable.txt.
1.6.13. SELinux details
Making the camera work with SELinux set to “Enforcing” was the last part of my debugging process.
Setting SELinux to “Enforcing” produced quite a few denial errors in the dmesg, but fixing all of them with sepolicy-inject and chcon did not really make the camera work, or even start.
02-15 20:16:53.495  8722  8722 I PreviewReceived: type=1400 audit(0.0:287): avc:  denied  { open } for  path="/dev/__properties__/u:object_r:vendor_default_prop:s0" dev="tmpfs" ino=464 scontext=u:r:platform_app:s0:c512,c768 tcontext=u:object_r:vendor_default_prop:s0 tclass=file permissive=1 app=com.oplus.camera
02-15 20:16:53.495  8722  8722 I PreviewReceived: type=1400 audit(0.0:288): avc:  denied  { getattr } for  path="/dev/__properties__/u:object_r:vendor_default_prop:s0" dev="tmpfs" ino=464 scontext=u:r:platform_app:s0:c512,c768 tcontext=u:object_r:vendor_default_prop:s0 tclass=file permissive=1 app=com.oplus.camera
02-15 20:16:53.495  8722  8722 I PreviewReceived: type=1400 audit(0.0:289): avc:  denied  { map } for  path="/dev/__properties__/u:object_r:vendor_default_prop:s0" dev="tmpfs" ino=464 scontext=u:r:platform_app:s0:c512,c768 tcontext=u:object_r:vendor_default_prop:s0 tclass=file permissive=1 app=com.oplus.camera
and
06-10 00:05:59.224  1026  1026 E SELinux : avc:  denied  { find } for interface=vendor.qti.hardware.camera.postproc::IPostProcService sid=u:r:platform_app:s0:c512,c768 pid=8558 scontext=u:r:platform_app:s0:c512,c768 tcontext=u:object_r:vendor_hal_camera_postproc_hwservice:s0 tclass=hwservice_manager permissive=0
06-10 00:05:59.264     0     0 E [T201019] SELinux: avc:  denied  { find } for pid=11375 uid=10184 name=oiface scontext=u:r:platform_app:s0:c512,c768 tcontext=u:object_r:default_android_service:s0 tclass=service_manager permissive=0
06-10 00:05:59.265     0     0 E [T201019] SELinux: avc:  denied  { find } for pid=11375 uid=10184 name=oiface scontext=u:r:platform_app:s0:c512,c768 tcontext=u:object_r:default_android_service:s0 tclass=service_manager permissive=0
audit2allow was always meeting “neverallow” failures, and all of this stuff is so terribly documented that I was almost in despair.
However, two ideas came to my mind.
The first one is that it does make a lot of sense to give the app process its own SELinux context (domain, label).
It took me a while to find out how to do that, as doing it in a naive way (just adding a type opluscamera_app and adding a line to seapp_contexts) was causing a boot-loop.
However, at the end of the day I did something, and this something satisfies me.
I added a type opluscamera_app, and literally copied the definition of this type from platform_app.te.
This made sure that my app has all the same permissions as a normal “platform app”, but is running at a different label, and I can filter the logs by this label.
It also meant that I can add permissions to this label, without interfering with the main SELinux policy.
The drawback is that I had to declare this type not in the camera module but in the main sepolicy module (so my could would not be taken upstream), and add exceptions to the neverallow rules, which I do not mind, as there is only a single app running as this label, mine, and I do not intend to upstream it anyway.
I had to add neverallow exceptions like this:
system/sepolicy:
diff --git a/private/app.te b/private/app.te
index e4ac05b9c..441fb1889 100644
--- a/private/app.te
+++ b/private/app.te
@@ -521,7 +521,7 @@ allow appdomain zygote_tmpfs:file { map read };

 # Superuser capabilities.
 # bluetooth requires net_admin and wake_alarm. network stack app requires net_admin.
-neverallow { appdomain -bluetooth -network_stack } self:capability_class_set *;
+neverallow { appdomain -bluetooth -network_stack -opluscamera_app } self:capability_class_set *;

 # Block device access.
 neverallow appdomain dev_type:blk_file { read write };
@@ -746,7 +746,7 @@ neverallow {
 }:file no_x_file_perms;

 # Don't allow apps access to any of the following character devices.
-neverallow appdomain {
+neverallow {appdomain -opluscamera_app} {
     audio_device
     camera_device
     dm_device
@@ -758,6 +758,7 @@ neverallow appdomain {
 # needs access to /dev/video* for interfacing with the host
 neverallow {
     appdomain
+    -opluscamera_app
     -device_as_webcam
 } video_device:chr_file { read write };
device/qcom/sepolicy_vndr/sm8550/:
diff --git a/generic/vendor/common/domain.te b/generic/vendor/common/domain.te
index 0f4f0539e..2e256d693 100644
--- a/generic/vendor/common/domain.te
+++ b/generic/vendor/common/domain.te
@@ -85,6 +85,7 @@ neverallow { domain
 - hal_contexthub_default
 - hal_sensors_default
 - hal_camera_default
+- opluscamera_app
 userdebug_or_eng(` -vendor_usta_app')
 userdebug_or_eng(` -vendor_ustaservice_app')
 userdebug_or_eng(` -vendor_sysmonapp_app_test')
@@ -111,6 +112,6 @@ neverallow { domain
 userdebug_or_eng(` -vendor_sysmonapp_app_test')
 } vendor_qdsp_device:chr_file *;
 neverallow { domain -init -vendor_init - ueventd } vendor_qdsp_device:chr_file ~{r_file_perms};
-neverallow { appdomain - shell userdebug_or_eng(`-vendor_sysmonapp_app_test') } vendor_qdsp_device:chr_file ~{ioctl read};
+neverallow { appdomain - shell userdebug_or_eng(`-vendor_sysmonapp_app_test') -opluscamera_app } vendor_qdsp_device:chr_file ~{ioctl read};
 neverallow mediacodec vendor_qdsp_device:chr_file ~{ioctl read};
This allowed me to study the behaviour of the camera app without interfering with the workings of the “platform_app” label.
Another revelation, and I cannot call it by anything else, came when I was painfully and hopelessly staring through these two documents:
- https://source.android.com/docs/core/architecture/aidl/aidl-hals#sepolicy
- https://android.googlesource.com/platform/system/sepolicy/+/refs/heads/master/public/te_macros
The first one is written so badly that having it written in Swahili and read by a non-Swahili speaker would not hurt much. The second is just “the source”, you cannot expect much from it.
In any case, some of my SELinux denials were about vendor_hal_camera_postproc_hwservice, and none of the statements like hal_client_domain(opluscamera_app, hal_camera_postproc_hwservice), or hal_client_domain(opluscamera_app, hal_camera_postproc), or hal_hwclient_domain(opluscamera_app, hal_camera_postproc) were working.
Finally after spending a long time studying hardware/oplus/sepolicy/qti/vendor/, something clicked in my head and I wrote hal_client_domain(opluscamera_app, hal_camera).
This worked.
After looking once more at https://source.android.com/docs/core/architecture/aidl/aidl-hals#sepolicy , I decided that with a lot of mental gymnastics and imagination stretching, it is possible to see how the official document is claiming that this is actually what should be written, but, honestly, this approach to documentation is just horrible.
In any case, even though I had to add a type and edit the main tree, I am satisfied with this solution, because the app is running confined.
As a side-note, the camera app is actually requiring selinux_check_access(opluscamera_app), that is, its behaviour is different depending on whether SELinux is Enforcing, Permissive, or off.
Which is a bad coding practice.
1.6.14. Potential future work
I do not have time to work on the camera any more, but I hope that someone can take over this honourable task.
I also did not find a good way to identify thread pools and find out which places are placing the tasks on the queue, so the code for me looks like “functions starting at libc pthread_start”.
It would be nice if someone submits a fragment to this howto on how to track task entry into thread pool.
1.6.15. App structure
This section is speculative, I am by no means an expert on Android Cameras.
I saw three processes interaction over Binder:
com.oplus.camera:: appcameraserver:: Android camera HAL service processvendor.qti.camera.provider-service_64:: Qualcomm device process
The camera app had basically two big image-processing parts: preview and shooting.
Both of those were implemented in the libAlgoProcess.so, which was dlopen from some of the camera built-in .so files.
libAlgoProcess.so interacted with the cameraserver (?) somehow to obtain the image (buffer array), or several images as AHardwareBuffer_Planes.
After a buffer was obtained, it did post-processing on this buffer, either inside itself (depending on a key persist.vendor.camera.jpeghwencode), or passing the buffer to the vendor.qti.camera.provider-service_64 to do post-processing in hardware.
All of this was followed by “CameraMetadata”, indexed by “VendorTags”, which contained some important information about streams and buffers.
The camera process had some kind of “collection of typical pipelines”, called “usecases”, and in fact, a lot of Qualcomm code is named “CHI::usecase” – Camera HAL Interface Usecase.
I cannot believe that vendor.qti.camera.provider-service_64 is used only for post-processing.
A camera process is naturally expected to also do capturing.
But I did not find where capturing happens.
1.7. Collected Bibliography
- OS details :: https://source.android.com/
- https://source.android.com/docs/setup/start/requirements
- https://source.android.com/docs/setup/download/source-control-tools
- https://www.akshaydeo.com/switching-branch-with-repo-for-android-source-code/
- https://source.android.com/docs/setup/reference/repo
- https://developer.android.com/studio/platform :: Android Studio for Platform
- https://source.android.com/docs/setup/build/building-kernels
- https://source.android.com/docs/core/architecture/vintf
- https://source.android.com/docs/core/architecture
- https://source.android.com/docs/core/architecture/configuration/add-system-properties
- https://source.android.com/docs/setup/reference/androidbp
- https://ci.android.com/builds/submitted/13288697/linux/latest/view/soong_build.html
- https://android.stackexchange.com/questions/58184/writing-to-dev-log-main-from-command-line
- https://files.serverless.industries/bin/
- https://android.googlesource.com/platform/system/core/+/master/init/README.md
- https://android.stackexchange.com/questions/203951/how-can-i-make-a-symlink-or-equivalent-inside-storage-emulated-0/
- https://www.xda-developers.com/diving-into-sdcardfs-how-googles-fuse-replacement-will-reduce-io-overhead/ :: sdcardfs
- https://android.stackexchange.com/questions/197959/why-partition-gets-unmounted-automatically-after-some-time/200449#200449
- https://android.stackexchange.com/questions/214288/how-to-stop-apps-writing-to-android-folder-on-the-sd-card/
- https://android.stackexchange.com/questions/217741/how-to-bind-mount-a-folder-inside-sdcard-with-correct-permissions/217936#217936
- https://developer.android.com/training/data-storage#scoped-storage
- https://github.com/Heydarchi/AIDL-HAL-Service
- https://source.android.com/docs/core/camera/buffer-management-api
- https://developer.android.com/ndk/reference/group/a-hardware-buffer
- https://source.android.com/docs/core/camera/camerax-vendor-extensions
- https://source.android.com/docs/core/camera/camera3
- https://issuetracker.google.com/issues/261760717
- Apps :: https://developer.android.com/
- https://developer.android.com/studio
- https://gradle.org/ :: Gradle
- https://developer.android.com/topic/architecture?hl=en
- https://rtx.meta.security/reference/2024/07/03/Android-system-apps.html :: App permissions
- https://android.stackexchange.com/questions/210139/what-is-the-u-everybody-uid/
- https://developer.squareup.com/blog/advocating-against-android-fragments/
- https://stackoverflow.com/questions/31236020/fragment-vs-custom-view-in-android
- https://github.com/xxv/android-lifecycle/
- https://android.stackexchange.com/questions/208523/how-androids-permissions-mapping-with-uids-gids-works/208982#208982
- https://source.android.com/devices/storage#runtime_permissions
- LineageOS documentation :: https://lineageos.org/engineering/
- Qualcomm documentation
- SELinux
- https://stackoverflow.com/questions/36790794/what-is-c512-c768-of-selinux-process
- https://github.com/SELinuxProject/selinux-notebook/
- https://source.android.com/docs/security/features/selinux/device-policy#label_new_services_and_address_denials
- https://source.android.com/docs/core/architecture/aidl/aidl-hals#sepolicy
- https://android.googlesource.com/platform/system/sepolicy/+/refs/heads/master/public/te_macros
- Linux, kernel, and drivers
- Debugging
- https://github.com/NationalSecurityAgency/ghidra/issues/6386#issuecomment-2455257933
- https://github.com/hugsy/gdb-static
- https://stackoverflow.com/questions/78044084/android-app-paused-while-debugging-due-to-sigbus-signal
- https://stackoverflow.com/questions/52377562/how-do-you-create-a-lldb-script-to-ignore-sigsegv-and-sigbus
- aarch64 and assembly
- https://mariokartwii.com/armv8/
- https://github.com/grammatech/ddisasm
- https://en.wikipedia.org/wiki/Executable_and_Linkable_Format
- https://thinkingeek.com/categories/aarch64/
- https://blog.k3170makan.com/2018/09/introduction-to-elf-format-elf-header.html
- https://nostarch.com/GhidraBook :: The Ghidra Book The Definitive Guide by Chris Eagle and Kara Nance
- https://github.com/PacktPublishing/Learning-Linux-Binary-Analysis :: Learning Linux Binary Analysis by Ryan “Elfmaster” O’Neill
- https://blog.nviso.eu/2024/01/15/deobfuscating-android-arm64-strings-with-ghidra-emulating-patching-and-automating/ :: Debugging Android aarch64 with Ghidra
- https://sallam.gitbook.io/sec-88/android-appsec/smali/smali-cheat-sheet
- https://www.jemarch.net/poke-elf.html :: GNU Poke-ELF
- https://cilynx.com/vulnerabilities/exploring-native-functions-on-android-and-runtime-analyses-using-jadx-ghidra-and-frida/1565/
- https://github.com/iddoeldor/frida-snippets?tab=readme-ov-file
- https://github.com/iddoeldor/frida-snippets?tab=readme-ov-file#binder-transactions
- https://github.com/Hamz-a/frida-android-libbinder
- https://www.youtube.com/watch?v=RoNppaG1re4
- Mirrors
- General-purpose links
2. Blurb
- Mail (best way to reach me) :: lockywolf at lockywolf.net
- Telegram :: https://t.me/unobvious
- Zhihu (cn) :: https://www.zhihu.com/people/lockywolf
- LiveJournal (ru) :: https://dead-doomer.livejournal.com
- Wordpress (en) :: https://lockywolf.wordpress.com
- Permalink :: https://lockywolf.net/2026-02-19_How-to-install-and-start-using-LineageOS-on-your-phone.d/index.html